ESP8266 Write Multiple Fields Thingspeak.com
#include <ESP8266WiFi.h>
#include "secrets.h"
#include "ThingSpeak.h" // include thingspeak header
#include <math.h>
char ssid[] = SECRET_SSID; // your network SSID (name)
char pass[] = SECRET_PASS; // your network password
int keyIndex = 0; // your network key Index number (needed only for WEP)
WiFiClient client;
unsigned long myChannelNumber = SECRET_CH_ID;
const char * myWriteAPIKey = SECRET_WRITE_APIKEY;
// Schematic:
// [+3V] ---- [Thermistor 10k-Resistor] -------|------- [10k-Resistor] ---- [Ground]
// |
// Analog Pin A0
int analogpin = A0;
int sensorvalue;
float Vin;
float Temp_C; // Celsius
float Temp_K; // Kelvin
float Temp_F; // Fahrenheit
//*****************************************************************************************************
float Thermistor(int RawADC){ //Function to perform math of the Steinhart-Hart equation
Temp_C = log(((10230000/RawADC)-10000)); // Temp = log(10000.0*((1023.0/RawADC-1)));
Temp_C = 1/(0.001129148+(0.000234125+(0.0000000876741*Temp_C*Temp_C))*Temp_C);
Temp_C = Temp_C - 273.15; // Convert Kelvin to Celsius
return Temp_C;
}
//*****************************************************************************************************
// Initialize values
int number1 = 0;
int number2 = 0;
int number3 = 0;
int number4 = 0;
String myStatus = "";
//*****************************************************************************************************
void setup() {
Serial.begin(115200); // Initialize serial
while (!Serial) {
; // wait for serial port to connect. Needed for Leonardo native USB port only
}
WiFi.mode(WIFI_STA);
ThingSpeak.begin(client); // Initialize ThingSpeak
}
//*****************************************************************************************************
void loop() {
// Connect or reconnect to WiFi
if(WiFi.status() != WL_CONNECTED){
Serial.print("Attempting to connect to SSID: ");
Serial.println(SECRET_SSID);
while(WiFi.status() != WL_CONNECTED){
WiFi.begin(ssid, pass); // Connect to WPA/WPA2 network. Change this line if using open or WEP network
Serial.print(".");
delay(5000);
}
Serial.println("\nConnected.");
}
//****************************************************************************************************
Vin = sensorvalue*(3.0/1023.0);
sensorvalue = analogRead(analogpin);
Temp_C = Thermistor(sensorvalue); // Temp_C = Thermistor(analogRead(analogpin));
Temp_K = Temp_C + 273.15; // Convert Kelvin to Celcius
Temp_F = (Temp_C*1.8) + 32.0; // Convert Celsius to Fahrenheit
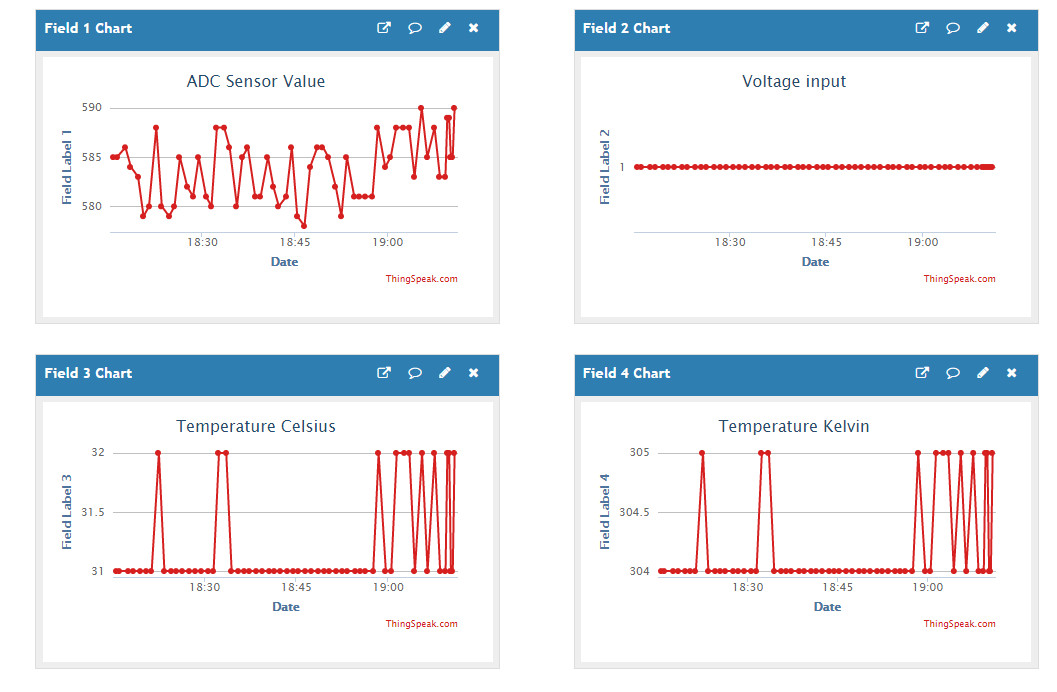
Serial.print("ADC Sensor Value\t");
Serial.print(sensorvalue);
Serial.print("\t");
Serial.print("Voltage input\t");
Serial.print(Vin);
Serial.print("\t");
Serial.print("Temperature Celsius\t");
Serial.print(Temp_C);
Serial.print("\t");
Serial.print("Temperature Kelvin\t");
Serial.print(Temp_K);
Serial.print("\t");
Serial.print("Temperature Fahrenheit\t");
Serial.print(Temp_F);
Serial.println("\t");
number1 = sensorvalue;
number2 = Vin;
number3 = Temp_C;
number4 = Temp_K;
//****************************************************************************************************
// set the fields with the values
ThingSpeak.setField(1, number1);
ThingSpeak.setField(2, number2);
ThingSpeak.setField(3, number3);
ThingSpeak.setField(4, number4);
//****************************************************************************************************
// figure out the status message
if(number1 > number2){
myStatus = String("field1 is greater than field2");
}
else if(number1 < number2){
myStatus = String("field1 is less than field2");
}
else{
myStatus = String("field1 equals field2");
}
//****************************************************************************************************
// set the status
ThingSpeak.setStatus(myStatus);
//****************************************************************************************************
// write to the ThingSpeak channel
int x = ThingSpeak.writeFields(myChannelNumber, myWriteAPIKey);
if(x == 200){
Serial.println("Channel update successful.");
}
else{
Serial.println("Problem updating channel. HTTP error code " + String(x));
}
//****************************************************************************************************
delay(5000); // Wait 5 seconds to update the channel again
//****************************************************************************************************
}
Channel update successful.
ADC Sensor Value 585 Voltage input 1.72 Temperature Celsius 31.73 Temperature Kelvin 304.88 Temperature Fahrenheit 89.11
Problem updating channel. HTTP error code -401
https://thingspeak.com/channels/1452499