- MXL, XL, L, H, XH, XXH /Inch Unit / Trapezoid tooth
- DXL, DL, DH /Inch Unit / Double-sided ladder tooth
- HTD 2M, 3M, 5M, 8M, 14M, 20M / Arc tooth
- D3M, D5M, D8M, D14M / Double-sided arc tooth
- S2M, S3M, S4.5M, S5M, S8M, S14M / Semi-circular tooth
- DS5M, DS8M, DS14M / Double-sided semi-circular tooth
- P3M, P5M, P8M, P14M / Concave peak tooth
- T2.5, T5, T10, T20
- AT5, AT10
- 1.5GT, 2GT, 3GT, 5GT
ผู้เขียน: admin
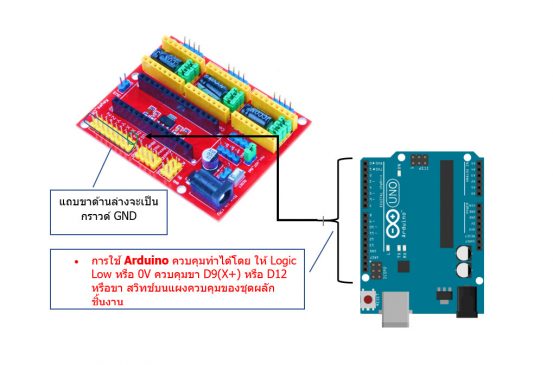
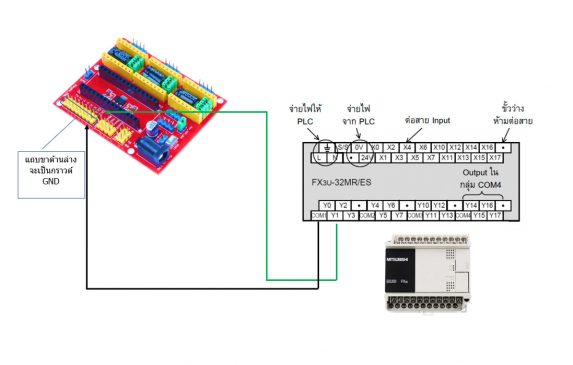
การต่อใช้งาน Rejector กับ PLC และ Arduino
พื้นฐานระบบอัตโนมัติ
พื้นฐานระบบอัตโนมัติ
ระบบอัตโนมัติ หรือ Automation ประกอบด้วย Hardware และ Software ที่ทำงานร่วมกัน ให้สามารถควบคุมการทำงาน ของระบบเป็นไปแบบอัตโนมัติ ระบบอัตโนมัติ นั้นจะเกี่ยวข้องกับ ระบบควบคุม Control System รวมถึงวิศวกรรมแมคคาทรอนิกส์และหุ่นยนต์พื้นฐานของระบบอัตโนมัติประกอบด้วยส่วนหลักๆคือ
- อินพุทจากเซนเซอร์ต่างๆ เซ็นเซอร์วัดความดัน Pressure sensor, เซ็นเซอร์อุลตราโซนิค Ultrasonic sensor , เซ็นเซอร์ความชื้น Humidity sensor, เซ็นเซอร์วัดก๊าซ Gas sensor, เซ็นเซอร์ตรวจจับการเคลื่อนไหวแบบพีไออาร์ PIR motion sensor, เซ็นเซอร์วัดความเร่ง Acceleration sensor, เซ็นเซอร์วัดแรง Force sensor, เซ็นเซอร์สี color sensor, เซ็นเซอร์เซ็นเซอร์วัดมุมและการหมุน gyro sensor, เซ็นเซอร์อัลตราโซนิก ultrasonic sensor และอื่นๆเช่น เทอร์โมไพล์
- การสื่อสาร – สายเคเบิล USB, RS485, Wi-Fi และอื่นๆ
- ตัวควบคุม เช่น MCU และอื่นๆ
- เอาท์พุท – เช่นวาล์ว, มอเตอร์, หลอดไฟ, ลำโพง และอื่นๆ
การต่อใช้งานและการคำนวณ Stepper Motor, 0.36Nm Holding Torque, 5mm Shaft
- 42BYGH48 Stepper Motor
- 1.4A
- 0.4Nm 48mm Nema-17 Stepper Motor
- To calculate the linear motion, The following equation was used
เริ่มต้นใช้งาน Mixly กับ Robot Biped หุ่นยนต์เดิน 2ขา ด้วย Arduino Nano
เริ่มต้นใช้งาน Mixly
Mixly เป็นฟรีโอเพ่นซอร์สซอฟต์แวร์กราฟิกภาษา Visual Arduino ซึ่งจะทำให้การเขียนโปรแกรมทำได้ง่ายเหมือนกับการสร้างบล็อค Mixly GUI ได้รับการพัฒนาบนพื้นฐานของ Blockly และ Java8 ซึ่งสามารถทำงานได้บน OS Win7 หรือสูงกว่า มีไฟล์การติดตั้ง Arduino IDE รวมถึงโค้ดตัวอย่าง
1. ดาวน์โหลด โปรแกรม mixly ได้ที่ http://wiki.sunfounder.cc/index.php?title=Get_started_with_Mixly
อินเทอร์เฟซหลักของ Mixly

1 ด้านซ้าย พื้นที่ Blocks หมวดหมู่ บล็อก สำหรับเขียนโปรแกรม
2 ตรงกลาง พื้นที่เขียนโปรแกรม วาง Blocks
3 ด้านขวา เพื่อซูมเข้าหรือซูมออกและลบ
4 แถบสีเทาที่ด้านล่างสุดเป็นแถบเครื่องมือรวมถึงเมนูฟังก์ชันทั้งหมด
5 ด้านล่างสุดคือแถบแสดงข้อความ
Blocks
Mixly วางการเขียนโปรแกรมให้อยู่ในรูป Block ซึ่งได้แก่ In / Out, Control, SerialPort และ Block หมวดหมู่บล็อกอื่น ๆ ที่จำเป็นต้องใช้คำนวณทางคณิตศาสตร์ เช่น Math, Block ที่จำเป็นต้องใช้สำหรับ Biped Robot หุ่นยนต์เดิน 2ขา นั้นมีดังนี้
- In/Out: DigitalRead, DigitalWrite, AnalogRead, AnalogWrite, attachInterrupt, detachInterrupt, ShiftOut, etc.
- Control: Delay, if…do…, repeat…do…, System running time, setup, etc.
- Math: Map, Constrain, operations like +/-, sin/cos, random integer from…to… etc.
- Logic: if conditional statement, logical operations
- SerialPort: set baud rate, print data, read data
- Communicate: IR receive, IR send, I2C read/write device, to SPI, etc.
- Sensor: ultrasonic, DHT11, DS18B20
- Actuator: Tone control, servo and stepper control.
- Monitor: setup LCD pin, LCD print data, set LCD I2C address
- Variables: High/Low, True/False, float, integer, Boolean, string variables, etc.
- Functions: define function, do procedure with, etc.
ไดร์เวอร์
เมื่อเราเชื่อมต่อบอร์ด Arduino Nano เข้ากับคอมพิวเตอร์ คอมพิวเตอร์อาจแสดง “Unknown Device” หรือ “USB Serial Port” ด้วยเครื่องหมายอัศเจรีย์สีเหลือง ให้เราทำการตติดตั้งไดรเวอร์ให้เรียบร้อย โดยการ คลิกขวาที่ “Unknown Device” หรือ “USB Serial Port” พร้อมเครื่องหมายอัศเจรีย์สีเหลืองและคลิก “Update Driver Software” จากนั้นคลิก “Browse my computer for driver software”
ตัวอย่าง การเขียนโปรแกรม Mixly ควบคุมหุ่นยนต์
- ให้เชื่อมต่อบอร์ด Arduino Nano กับคอมพิวเตอร์ ด้วยสาย USB ที่เตรียมไว้ให้
- จากนั้นเปิด โปรแกรม Mixly เลือกประเภทของบอร์ดเป็น (Arduino Nano) และเลือกพอร์ต Com Port ให้ตรง
- จากนั้นไปที่ Open เพื่ออัพโหลดไฟล์โปรแกรม เราจะเห็นผลลัพธ์ของแต่ละโปรแกรม ว่า Biped Robot ทำงานตามโปรแกรมอย่างไร
1. ตัวอย่าง โปรแกรมการปรับเซอร์โวทั้ง 4 ตัว ของหุ่นยนต์แบบเดินสองขา

2. ตัวอย่าง โปรแกรมหุ่นยนต์เดินสองขา เดินหน้าถอยหลัง เลี้ยวซ้ายเลี้ยวขวา

3. ตัวอย่าง โปรแกรมหุ่นยนต์แบบสองขาเต้น

4. ตัวอย่าง โปรแกรมหุ่นยนต์เดินสองขา หลบหลีกสิ่งกีกขวาง โดยใช้อัลตราโซนิคเซนเซอร์

5. ตัวอย่าง โปรแกรมควบคุมหุ่นยนต์ไร้สายด้วยรีโมทอินฟราเรด

ดาวน์โหลด
- ตัวอย่าง Mixly programming โปรแกรม Biped Robot หุ่นยนต์เดิน 2ขา
- โปรแกรม mixly ได้ที่ http://wiki.sunfounder.cc/index.php?title=Get_started_with_Mixly
ตัวอย่างโปรแกรมใช้ Arduino + Photoelectric Sensor
ตัวอย่างโปรแกรมใช้ Arduino
เมื่อไม่มีวัตถุใดๆอยู่ตรงหน้าเซนเซอร์ เอาต์พุตเป็น 1 เมื่อมีวัตถุใดๆอยู่ตรงหน้าเซนเซอร์ เอาต์พุตเป็น 0
int sensorValue_Proximity_Photoelec = 0;
int sensorValue_Proximity_Inductive = 0;
void setup() {
  // put your setup code here, to run once:
  //start serial connection
  Serial.begin(9600);
  //configure pin2 as an input and enable the internal pull-up resistor
  pinMode(9, INPUT_PULLUP);//Photo
  pinMode(10, INPUT_PULLUP);//Metal sensor

  pinMode(2, OUTPUT); //CLK step
  pinMode(3, OUTPUT); //DIR step
  pinMode(4, OUTPUT); //IN1 L298
  pinMode(5, OUTPUT); //IN2 L298
}

void loop() {
  // put your main code here, to run repeatedly:
sensorValue_Proximity_Photoelec = digitalRead(9);
sensorValue_Proximity_Inductive = digitalRead(10);

  Serial.print("Photoelec D9 = ");
  Serial.print(sensorValue_Proximity_Photoelec);

  Serial.print("t Inductive D10 = ");
  Serial.println(sensorValue_Proximity_Inductive);
}

Photoelectric Sensor type
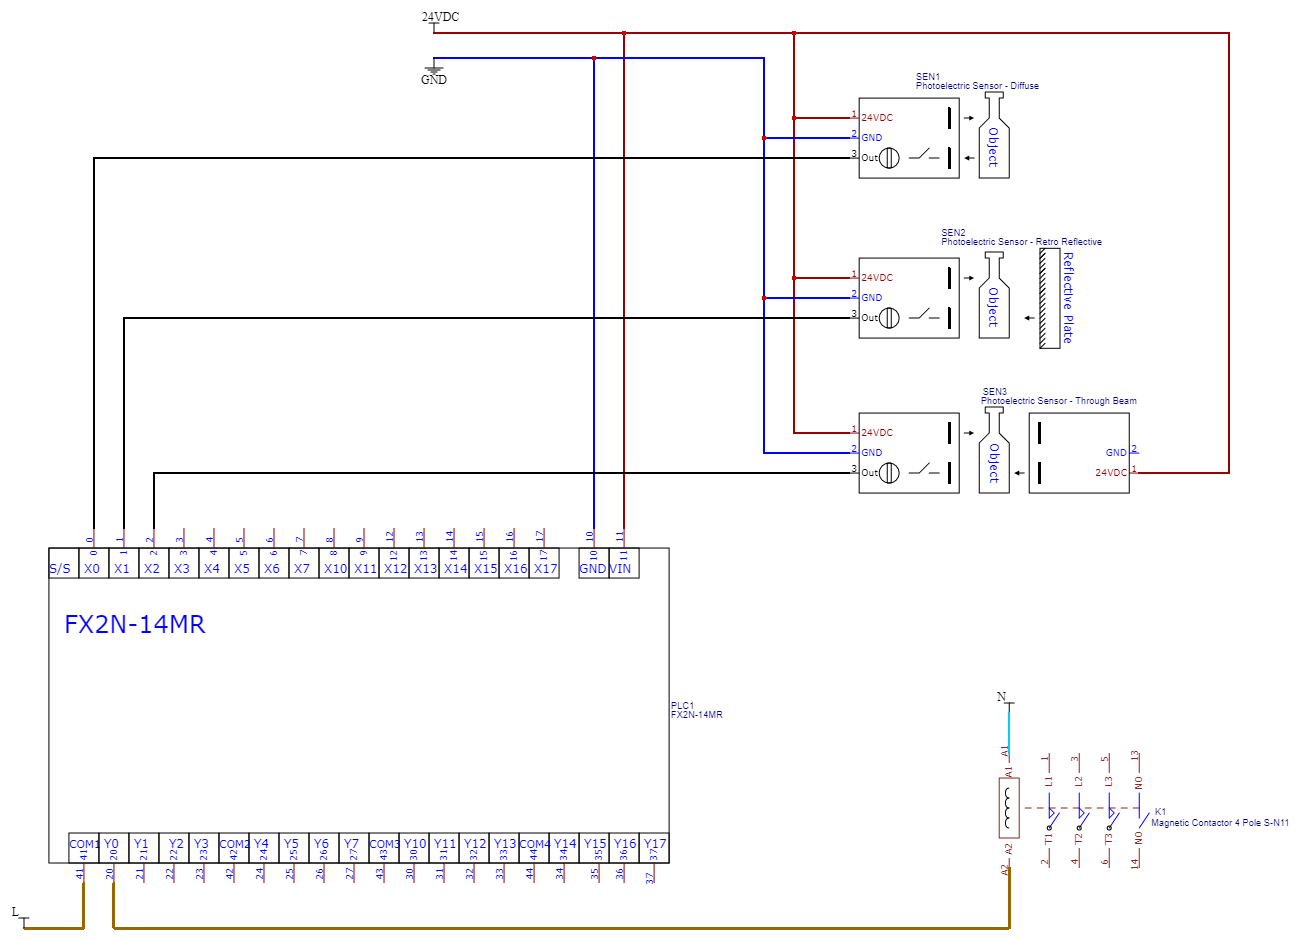
1.Through-beam type เป็นเซนเซอร์ที่มีภาคส่งและภาครับแยกกัน ติดตั้งหันเข้าหากัน อาศัยการตรวจจับโดยการเปรียบเทียบปริมาณแสงขณะไม่มีวัตถุและขณะมีวัตถุุเคลื่อนที่ผ่าน ภาครับ Receiver ภาคส่ง Transmitter ทำให้เซนเซอร์ทราบว่ามีวัตถุพร้อมส่งสัญญาณเอาท์พุท
2.Diffuse reflective type เป็นเซนเซอร์ประเภทตรวจจับโดยตรง ภายในเซนเซอร์ประกอบด้วยภาครับ Receiver ภาคส่ง Transmitter ภาคส่งจะทำหน้าที่ปล่อยแสง เมื่อวัตถุเคลื่อนที่บังลำแสง แสงจะสะท้อนกลับไปยังภาครับ เปรียบเทียบปริมาณแสงก่อนและหลังการสะท้อนทำให้เซนเซอร์ทราบว่ามีวัตถุพร้อมส่งสัญญาณเอาท์พุท
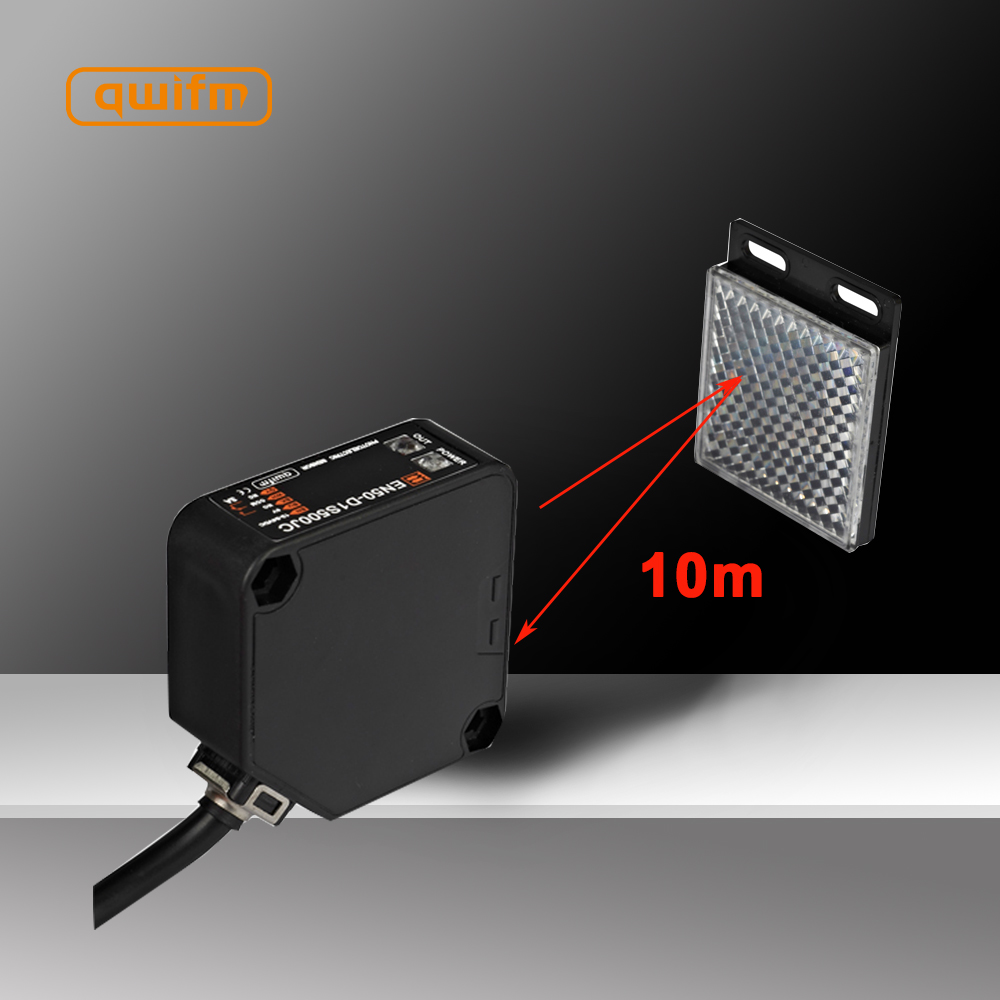
3.Retroreflective type เป็นเซนเซอร์ที่มี ภาครับ Receiver ภาคส่ง Transmitter อยู่ในตัวเดียวกัน ทำงานร่วมกับแผ่นสะท้อน Reflectors อาศัยการตรวจจับโดยรับแสงที่สะท้อนจากแผ่นสะท้อน จากนั้นเปรียบเทียบกับแสงขณะวัตถุเคลื่อนที่ผ่าน ระหว่างเซนเซอร์กับแผ่นสะท้อน Reflectors ทำให้เซนเซอร์ทราบว่ามีวัตถุพร้อมส่งสัญญาณเอาท์พุท

การติดตั้งไลบรารี่ Library สำหรับ Arduino IDE

การติดตั้งไลบรารี่ Library สำหรับ Arduino IDE
Library คืออะไร?
Library คือชุดของ Code ที่ช่วยให้เราติดต่อกับเซนเซอร์ จอแสดงผล โมดูล ฯลฯ ได้ง่าย ตัวอย่างเช่น Library LiquidCrystal ช่วยให้ติดต่อกับจอ LCD แบบตัวอักษรเป็นเรื่องง่าย Library มีให้ดาวน์โหลดบนอินเทอร์เน็ต มากมาย
วิธีการติดตั้ง Library
การติดตั้ง Library ใหม่ใน ให้เปิด Arduino IDE และคลิกไปที่เมนู “Sketch” จากนั้นเลือก Include Library >> Add.ZIP Library…
จากนั้นทำการเลือก Library .ZIP ที่ดาวน์โหลดมา
การเขียนโปรแกรมเชิงภาพสำหรับ Arduino ใช้ ardublockly

การเขียนโปรแกรมเชิงภาพสำหรับ Arduino ใช้การสร้างโค้ด Arduino และอำนวยความสะดวกในการอัปโหลดโปรแกรมโดยอิงตามบล็อก
คุณสมบัติ
สร้างโค้ด Arduino พร้อมบล็อกแบบลากแล้วปล่อย
โหลดโค้ดลงบอร์ด Arduino
“คำเตือนการบล็อกโค้ด” ที่เป็นประโยชน์
ใช้งานร่วมกับบอร์ด Arduino อย่างเป็นทางการได้หลากหลาย
รันบน Windows / Linux / Mac OS X
Ardublockly ยังอยู่ในระหว่างการพัฒนาและยังไม่ได้ใช้งานคุณสมบัติบางอย่าง คุณสามารถดูรายการสิ่งที่ต้องทำได้ในไฟล์ TODO.md
ปัจจุบันทดสอบภายใต้ Windows ด้วย Python 2.7 และ 3.4 และใน Linux และ MacOS X ด้วย Python 2.7

ข้อมูลเพิ่มเติม
- https://ardublockly.embeddedlog.com/demo/index.html#
- https://github.com/carlosperate/ardublockly
- https://developers.google.com/blockly/
การต่อใช้งาน Photoelectric Sensor กับ PLC
การต่อใช้งาน Photoelectric Sensor กับ PLC