คำอธิบาย
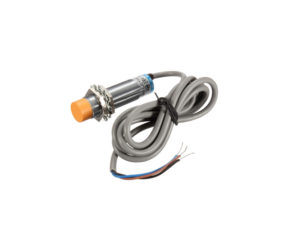
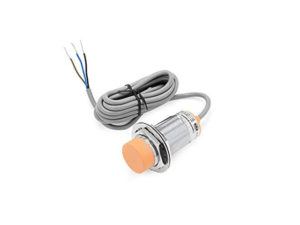
Color Sensor เซนเซอร์สี แสงสีขาว Color mark Sensor ใช้สำหรับการตรวจจับวัตถุ ผลิตภัณฑ์ในงานอุตสาหกรรม สามารถใช้กับบรรจุภัณฑ์ เช่น ถุงกระดาษ, ฟิล์มใส, ฟิล์มอลูมิเนียม
- Color mark sensor bag making machine packaging machine photoelectric eye รุ่น GDS-C21W คือรุ่นที่ใช้แสงสีขาว (White light source)เหมาะกับการตรวจจับชิ้นงานสะท้อนแสง, ตำแหน่งมาร์ค, หรือพื้นผิวเรียบในระยะสั้น
ข้อมูลเทคนิค
- แรงดันใช้งาน DC10-30V± 10% Ripple <10%
- Color Mark White
- ระยะการตรวจจับ Detection Distance 10mm ± 3mm
- Spot Emission Diameter Round 1.5 mm
- Detection Method Coaxial Reflection
- Response time 0.1-1ms
- Load current < 100mA
- Output current ≥ 80MA
- Resistant to ambient light Incandescent lamp 3000 Lux Sunlight 10000 Lux
- Protection grade IP67 (moisture-proof and dust-proof)
- Bright Pass/Dark Pass สลับ Conversion Dual Output,ป้องกันการลัดวงจร Reverse polarity protection
- Cable PVC length 2 Meters
สายต่อใช้งาน Wiring Diagram
- สายสีน้ำตาล Brown ไฟเลี้ยง
- สายสีดำ Black กราวด์ GND
- สายสีขาว White OUTPUT NPN
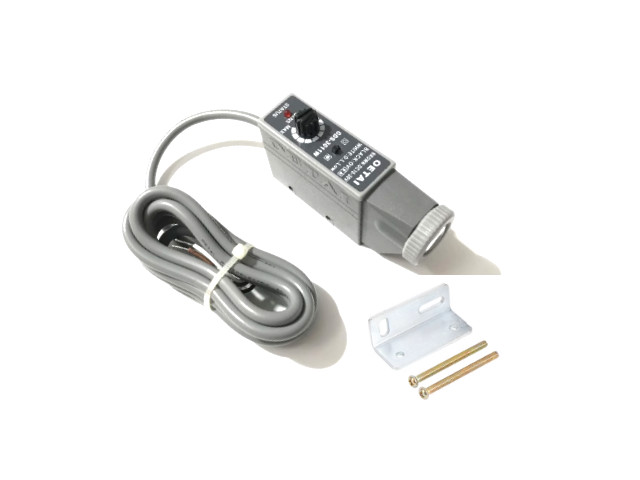
ในชุดประกอบด้วย
- 1pcs x เซนเซอร์ตรวจจับสี Color Sensors
- 1pcs x ฉากติดตั้ง Sensor Bracket
- 1set x สกรู Screw
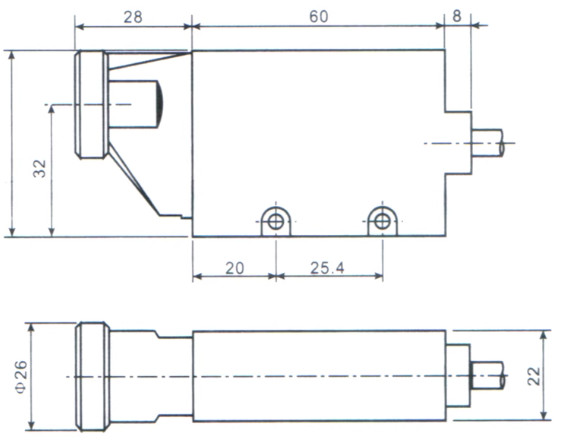
Dimensions
- 90(L) x 45(H) x 22(W)
Model selection
Single light source selection
“R” red light source
“G” green light source
“B” blue light source
“W” white light source
Pair light source selection
“WB” white and blue light source.
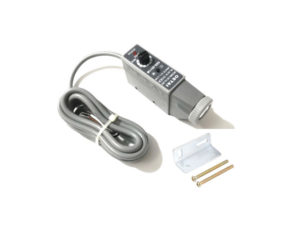
Photoelectric Mark Sensor (GDS-C21 / GDS-3011) – Setup & Sensitivity Tuning
Pre-setup
- Light source (LED color): Choose per the packaging color code you ordered: G = Green, R = Red, W = White, B = Blue.
- Output mode: Set Light-ON or Dark-ON to match your PLC logic.
- Mounting & distance: Keep the head perpendicular to the web. Sensing gap = 10 ± 2 mm.
- Spot vs. mark size: Beam ≈ 1–1.5 mm. Make sure the printed mark is wider than the spot.
- Example used below: Mark = light color; background = dark. (Invert Point (1) and (2) targets if your job is opposite.)
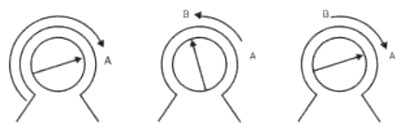
Adjusting Sensitivity (Three-point method)
Knob = sensitivity potentiometer. You will establish Point A and Point B, then set midway.
(1) Set Point A – Background
- Move web so the spot is on the dark background (outside the mark).
- Rotate the sensitivity counter-direction to MIN (bottom).
- Then turn clockwise slowly until the OUT1 indicator just turns ON.
- Mark this knob position as Point A.
(2) Set Point B – Mark center
- Move the web so the spot is in the middle of the light mark.
- Turn the knob slowly counter-clockwise until OUT1 just turns OFF (or “just right” threshold).
- Mark this knob position as Point B.
(3) Final set – Midpoint
- Rotate the knob to the midpoint between A and B.
- At this midpoint, OUT2 should be ON (per the indicator logic).
- Done. A–B distance large = stronger color contrast = more stable detection. If A and B are almost the same, your contrast is weak—see tips.
Pass/Fail & Tips
-
Stable: OUT toggles cleanly when crossing mark edges at line speed; no chatter.
If unstable / narrow A–B:
- Reduce ambient light; shield the head.
- Re-focus distance to 10 mm; keep perpendicular.
- Try a different LED color (e.g., Green for red/brown marks, Blue for yellow, White for general).
- Use a glossier / matte background to increase contrast, or increase mark width.
- Slow web speed during tuning, then re-check at production speed.
วิธีตั้งค่าตัวตรวจจับมาร์ค (GDS-C21 / GDS-3011)
ก่อนเริ่ม
- เลือกแหล่งกำเนิดแสง: ตามโค้ดบนกล่อง G=เขียว, R=แดง, W=ขาว, B=น้ำเงิน
- โหมดเอาต์พุต: ตั้ง Light-ON หรือ Dark-ON ตามลอจิกของเครื่อง/PLC
- การติดตั้ง: หน้าหัวตั้งฉากกับชิ้นงาน ระยะ 10 ± 2 มม.
- ขนาดลำแสง: ประมาณ 1–1.5 มม. ให้มาร์คกว้างกว่าลำแสง
- ตัวอย่างด้านล่าง: มาร์คสีอ่อน / พื้นหลังสีเข้ม (ถ้าโจทย์กลับกัน ให้สลับเป้าหมายของขั้นตอน (1) และ (2))
ปรับความไว (3 ขั้น)
(1) จุด A – พื้นหลัง
เลื่อนให้ลำแสงตกบน พื้นหลังสีเข้ม → หมุนปุ่มไปที่ ต่ำสุด → ค่อยๆ หมุน ตามเข็ม จน OUT1 ติดพอดี → จดตำแหน่งเป็นจุด A
(2) จุด B – กึ่งกลางมาร์ค
เลื่อนให้ลำแสงตกบน กึ่งกลางมาร์คสีอ่อน → ค่อยๆ หมุน ทวนเข็ม จน OUT1 ดับพอดี → จดตำแหน่งเป็นจุด B
(3) ตั้งค่าจริง
หมุนปุ่มไปที่ กึ่งกลางระหว่างจุด A และ B → OUT2 ควรติด → เสร็จสิ้น
ระยะ A–B กว้าง = คอนทราสต์สูง = การตรวจเสถียร หาก A–B แคบ ให้ดูคำแนะนำด้านล่าง
เกณฑ์ผ่าน/ไม่ผ่าน & เคล็ดลับ
-
สัญญาณต้อง สลับชัด เมื่อผ่านขอบมาร์ค ไม่มีอาการเด้ง
หากยังไม่นิ่ง / A–B แคบ:
- บังแสงรบกวน ปรับสภาพแสงภายนอก
- ปรับระยะให้ ใกล้ 10 มม. และตั้งหัวให้ ฉาก
- ลอง สีไฟ LED อื่น (เช่น เขียวกับมาร์คโทนแดง/น้ำตาล, น้ำเงินกับโทนเหลือง, ขาวใช้ทั่วไป)
- เพิ่มคอนทราสต์พื้นผิว หรือทำมาร์คให้กว้างขึ้น
- ปรับความเร็วสายพานให้ช้าเพื่อจูน แล้วทดสอบที่ความเร็วจริงอีกครั้ง
รีวิว
ยังไม่มีบทวิจารณ์