คำอธิบาย
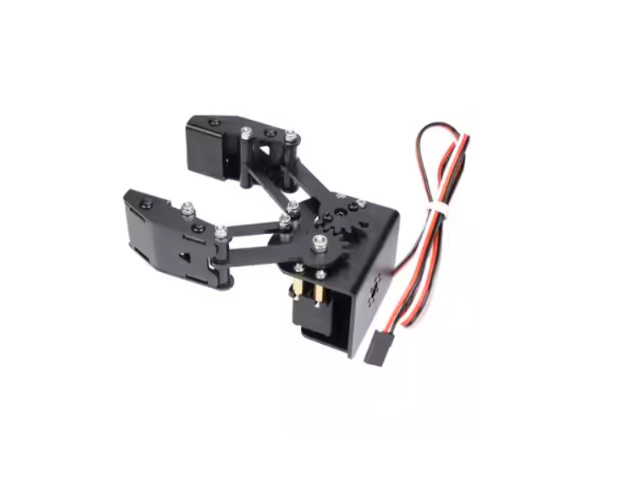
กริปเปอร์ Gripper มือจับหุ่นยนต์ Robot Finger ประยุกต์ใช้กับแขนหุ่นยนต์จับขวด BigClaw LDX-335 servo
ข้อมูลกริปเปอร์ Gripper
- วัสดุ อลูมิเนียมอัลลอย
- กริปเปอร์ Gripper Finger อ้ากว้าง 86 mm
- Finger 2
- การควบคุม ใช้กับ Servo Motor ควบคุม ความกว้างของพัลส์ PWM
มีอะไรเตรียมไว้ให้ในชุด
- 1set x กริปเปอร์ Gripper มือจับหุ่นยนต์ Robot Finger
- 1pcs x เซอร์โวมอเตอร์ แรงบิดสูง Digital High Torque RC Servo Motor LDX-335 Claws (including LDX-335 servos)
ข้อมูล Servo Motor
- แรงดัน 4.8 – 6.0 V
- ความเร็วทำงาน (4.8V) 0.23 วินาที / 60 องศา (No Load)
- ความเร็วทำงาน (6.0V) 0.19 วินาที / 60 องศา (No Load)
- แรงบิด (4.8V) / (3.2kg.cm)
- แรงบิด (6.0V) / (4.1kg.cm)
Dimension
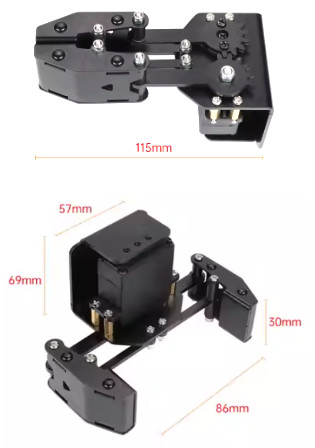
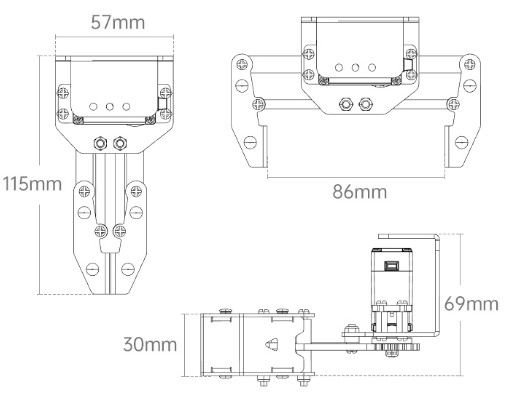
กริปเปอร์ไฟฟ้า มือจับหุ่นยนต์ Robot Finger Gripper C+RC Servo motor
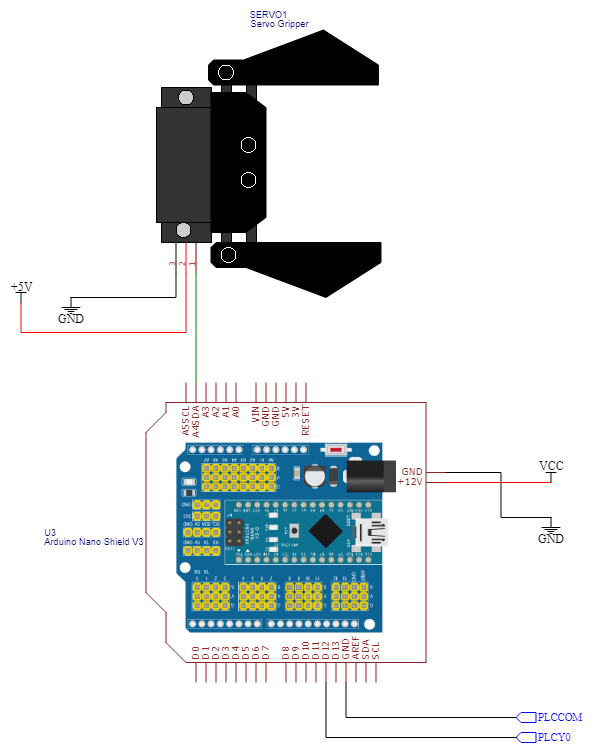
ตัวอย่าง Code ทดสอบ Gripper ใช้ Arduino
1 2 3 4 5 6 7 8 9 10 11 12 13 14 15 16 17 18 19 20 21 22 23 |
#include <Servo.h> Servo myservo; // create servo object to control a servo // twelve servo objects can be created on most boards int pos = 90; // variable to store the servo position void setup() { myservo.attach(9); // attaches the servo on pin 9 to the servo object } void loop() { //myservo.write(90); //ปล่อย //myservo.write(155); //จับ for (pos = 90; pos <= 155; pos += 1) { // goes from 0 degrees to 180 degrees // in steps of 1 degree myservo.write(pos); // tell servo to go to position in variable 'pos' delay(15); // waits 15ms for the servo to reach the position } for (pos = 180; pos >= 90; pos -= 1) { // goes from 180 degrees to 0 degrees myservo.write(pos); // tell servo to go to position in variable 'pos' delay(15); // waits 15ms for the servo to reach the position } } |
ตัวอย่าง Code ทดสอบ Gripper ใช้ Arduino รวมกับ PLC
1 2 3 4 5 6 7 8 9 10 11 12 13 14 15 16 17 18 19 20 21 22 23 24 25 26 27 28 29 30 31 32 33 34 35 36 37 38 39 40 41 42 43 |
#include <Servo.h> Servo myservo; // create servo object to control a servo int pos = 0; // variable to store the servo position int gripper_Open = 90; int gripper_Close = 175; const int buttonPin = 2; // the number of the pushbutton pin int buttonState = 0; // variable for reading the pushbutton status void setup() { // initialize the pushbutton pin as an input: pinMode(2, INPUT_PULLUP); myservo.attach(A4); // attach servo pin } void loop() { // read the state of the pushbutton value: buttonState = digitalRead(buttonPin); // check if the pushbutton is pressed. If it is, the buttonState is HIGH: if (buttonState == HIGH) { if (pos > gripper_Open) { for (pos = gripper_Close; pos >= gripper_Open; pos += 1) { // myservo.write(pos); delay(15); } } } else { if (pos < gripper_Close) { for (pos = gripper_Open; pos <= gripper_Close; pos += 1) { // myservo.write(pos); delay(15); } } } } |
เฉพาะลูกค้าที่เข้าสู่ระบบ และเคยซื้อสินค้าชิ้นนี้แล้วเท่านั้น ที่เขียนบทวิจารณ์ได้


 RBC102 หุ่นยนต์ Mecanum ROS Robot Car Wheel 80mm Arduino Raspberry PI Lidar


รีวิว
ยังไม่มีบทวิจารณ์