คำอธิบาย
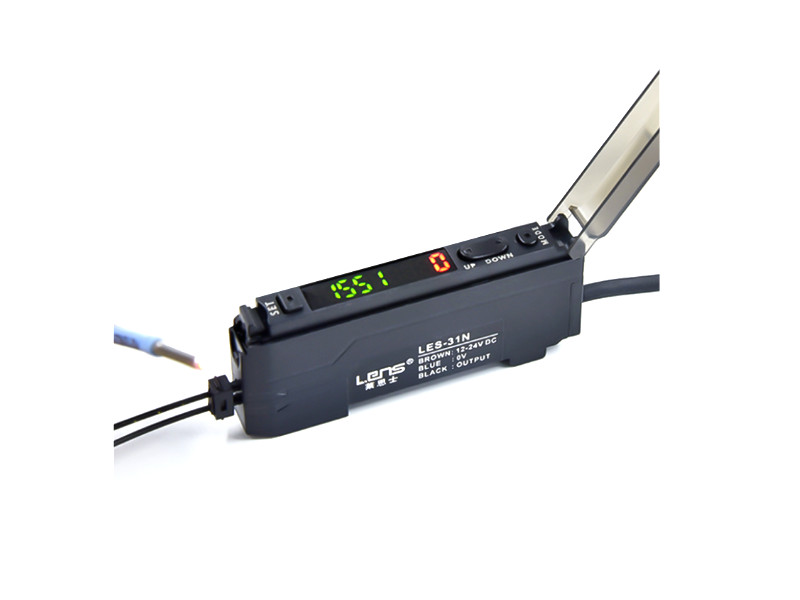
ไฟเบอร์ออฟติกเซนเซอร์ LES-31N สามารถใช้ทดแทน FS-N18N, FS-N11N, FS-V11 Fiber Optic Sensor Amplifier ใช้สำหรับการตรวจจับวัตถุสี ตรวจสอบสีของผลิตภัณฑ์ในงานอุตสาหกรรม สามารถใช้กับบรรจุภัณฑ์ หลายประเภท เช่น ฟิล์มใส, ฟิล์มอลูมิเนียม, ถุงกระดาษ
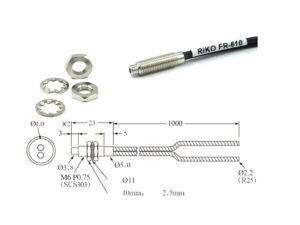
Detecting distance 0-80mm. Received light intensity 0-4095 ระยะการตรวจจับ 0-80 มม. รับความเข้มแสง 0-4095
ข้อมูลด้านเทคนิค
- Voltage Input DC12V-24V
- Output NPN
- Display 7-Segment
- Response time
- 50uS (High speed mode)
- 250uS (Standard )
- 500uS (Enhanced power mode)
- 1mS (Super power mode)
- Multiple Expansion connections to 16 units
- Optical sensor Light source Red, 4-Element LED
- Daylight 30,000 lux or less
- Mounted on DIN Rail
- Cable lenght 2M
ในชุดประกอบด้วย
- 1pcs x ไฟเบอร์ออฟติก เซนเซอร์ Fiber Optic Amplifier Sensor
- *ราคาไม่รวม สายโพรบ
Button function operation

Installation

As shown in the figure below, snap the left side of the fiber optic sensor amplifier on the DIN rail and press the arrow (1) on the right side. Press hard in the direction of the head until you hear the locking sound.
DIN rail Disassemble
- As shown in the figure below, push the sensor unit in the direction of the arrow (2);
- Lift in the direction of the arrow (3) until you leave the guide rail.
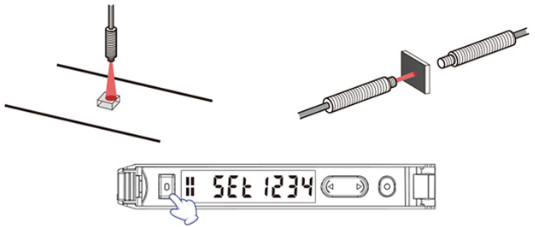
Fiber optic connection
As shown in the figure below, open the protective cover and vibrate the locking lever down in the direction of the arrow (4) ; Insert the optical fiber into the corresponding position; Press the direction of the arrow (5) to move the locking lever upward to complete the connection. Send < Receive > Function setting
คืนค่าโรงงาน Restore factory
กดปุ่ม MODE และ DOWN ค้างไว้พร้อมกันค้างไว้ 10 วินาทีขึ้นไปเพื่อคืนค่าการตั้งค่าจากโรงงาน
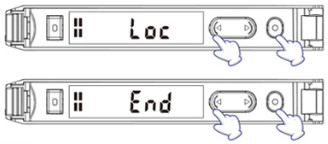
ล็อค-ปลดล็อค Lock-UnLock
- Lock : ล็อค : กดปุ่ม MODE และ UP ค้างไว้พร้อมกันค้างไว้ 3 วินาทีขึ้นไป เมื่อ “Loc” ปรากฏขึ้น แสดงว่าเสร็จสมบูรณ์
- UnLock : ทำซ้ำขั้นตอนข้างต้นอีกครั้ง และเมื่อ “End” แสดงขึ้น ปุ่มล็อคจะเป็น UnLock
การตั้งค่าเกณฑ์ Threshold value setting
1. ตั้งค่า Threshold ด้วยตนเอง Manually set the Threshold value
- ควรตั้งค่าเมื่อเซ็นเซอร์ติดตั้งอยู่กับที่
- เมื่อไม่มีชิ้นงานใดผ่านใยแก้วนำแสง ให้แตะปุ่ม SET หนึ่งครั้ง
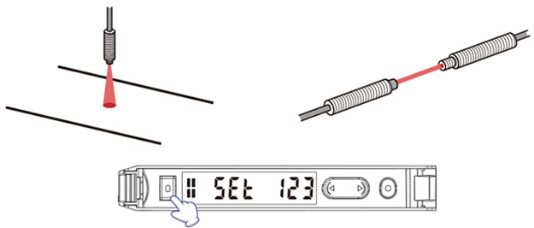
- เมื่อมีชิ้นงานผ่านใยแก้วนำแสง ให้แตะปุ่ม SET อีกครั้งเพื่อสิ้นสุดการตั้งค่าขีดเกณฑ์ Threshold
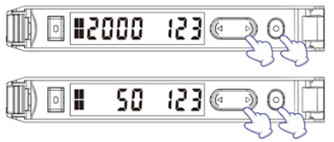
2. ตั้งค่า เกณฑ์ Threshold โดยอัตโนมัติ Automatically set the Threshold value
- ตั้งค่าขณะมีชิ้นงานผ่าน
- กดปุ่ม SET ค้างไว้จนกระทั่ง “SET” เริ่มกะพริบ จากนั้นค่าจะถูกถ่ายโอนโดยอัตโนมัติ และค่าจะถูกถ่ายโอนเป็นเวลาอย่างน้อย 3 วินาที ระยะเวลาที่กำหนดขึ้นอยู่กับความเร็วที่ชิ้นงานผ่าน

การตั้งค่าฟังก์ชัน Function settings
- ในระหว่างขั้นตอนการตั้งค่า ให้กดปุ่ม MODE บนอินเทอร์เฟซใดๆ ค้างไว้เป็นเวลา 3 วินาทีเพื่อกลับไปยังอินเทอร์เฟซหลัก
- ในระหว่างขั้นตอนการตั้งค่า ให้แตะปุ่ม MODE และ UP พร้อมกันเพื่อกลับไปยังระดับก่อนหน้า
- หลังจากเลือกโหมด delay แล้ว ให้แตะปุ่ม SET เพื่อเข้าสู่การตั้งค่า delay
การตั้งค่าอินเทอร์เฟซ Interface settings
กดปุ่ม O MODE ค้างไว้ 3 วินาทีเพื่อเข้าสู่อินเทอร์เฟซการตั้งค่า
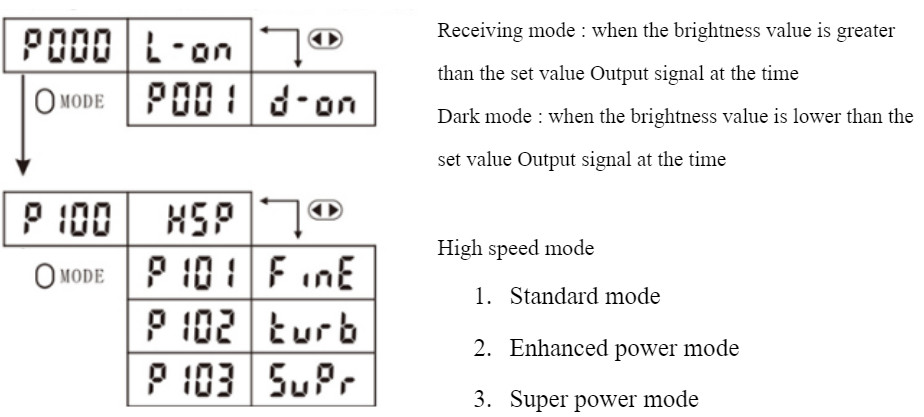
Light ON / Dark ON
- P000 = Light ON Mode
- P001 = Dark ON Mode
Response time
- P100 = Response time 50uS (High speed mode)
- P101 = Response time 250uS (Standard )
- P102 = Response time 500uS (Enhanced power mode)
- P103 = Response time 1mS (Super power mode)
P200 การส่องสว่างลำแสง 0 – 80
Anti-interference
- P300
- P301 Anti-interference
- P302 Submodule 1 (the host connection function takes effect)
- P303 Submodule 2 (the host connection function takes effect)
- P304 Submodule 3 (the host connection function takes effect)
P400 Delay Mode
- P400 Disable timer. (default setting)
- P401 Delay off-timer The output is turned off after 1234ms when the signal disappears.
- P402 Delay on-timer The output is turned on 1234ms after the signal is detected.
- P403 One-shot-timer The output is turned on when a signal is detected and turned off after 1234ms.
P500 Low Power mode
- P501 Power Saving mode
- P502 Normal mode
ข้อความแสดงข้อผิดพล Error message
| Display | Cause of error | วิธีการแก้ไขเบื้องต้น |
| Er: 00 | โหลดกระแสเกิน Load overcurrent | ตัดแหล่งจ่ายไฟและตรวจสอบโหลด |
| Er: 01 | ระบบเสียหาย System damage | เปลี่ยนเซ็นเซอร์ |
การประยุกต์ใช้งาน
- ตรวจสอบสีในอุตสาหกรรมการผลิต
- ตรวจจับตำแหน่งมาร์คสี
- ตรวจสอบความเข้มสี
- ตรวจสอบความแตกต่างสี

รีวิว
ยังไม่มีบทวิจารณ์