คำอธิบาย
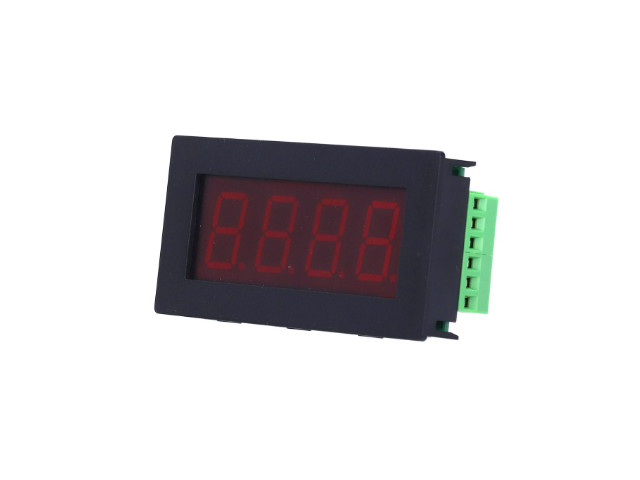
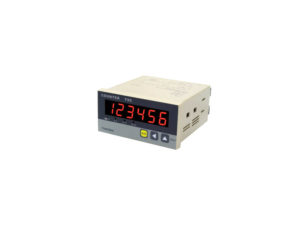
โมดูลแสดงผลแบบ 4 หลัก (4-digit) ขนาด 0.8 นิ้ว ที่รองรับการสื่อสาร MODBUS-RTU ผ่าน RS485 โดยมาในรูปแบบ housing module โมดูลจอแสดงผลกระบวนการ Process Display PLC MODBUS‑RTU RS485 4‑Digit Red PLC Display MODBUS‑RTU RS485 จอแสดงผล Process Display RS485 Modbus Plc Led 4 หลัก Dc5 36 V สําหรับ PLC Modbus Rtu
PLC Display Functions Monitoring Modbus PLC
- แรงดันไฟเลี้ยง Voltage DC5-36V
- หน้าจอแสดงผล: 7-Segment 4 หลัก (Four-digit)
- ขนาดตัวเลข: 0.8 นิ้ว
- การสื่อสาร: MODBUS-RTU (RS485)
- โปรโตคอลมาตรฐาน: 9600bps (หรือปรับได้), 8N1
- สามารถตั้งค่าตำแหน่งจุดทศนิยมได้และสามารถตั้งค่าอัตรารับส่งข้อมูล baud rate ได้ Baud Rate 1200bps/2400bps/4800bps/9600bps/19200bps/38400bps/57600bps/115200bps Default: 9600bps
- Digital Display 4 Digit
- เจาะฝังตัวเรือนมิเตอร์บนอุปกรณ์ได้
- จอแสดงผลหลอดดิจิตอลสีแดงสี่หลักสามารถตั้งค่าความสว่างได้
- อินเทอร์เฟซใช้เทอร์มินัลบล็อกทองแดง KF128-5.08mm
- การใช้งาน: สำหรับแสดงค่าจาก PLC หรือ Sensor ที่สื่อสารผ่าน MODBUS
การทำงาน
- ใช้โปรแกรม Modbus RTU (เช่น Modbus-Poll, หรือ USB-RS485 adapter) เพื่อส่งคำสั่ง
- คำสั่งทั้งหมดใช้ Function Code 06 (Write Single Register)
- หลังตั้งค่า Address และ Baud rate แล้ว ควรบันทึกค่าในระบบก่อนใช้งานจริง
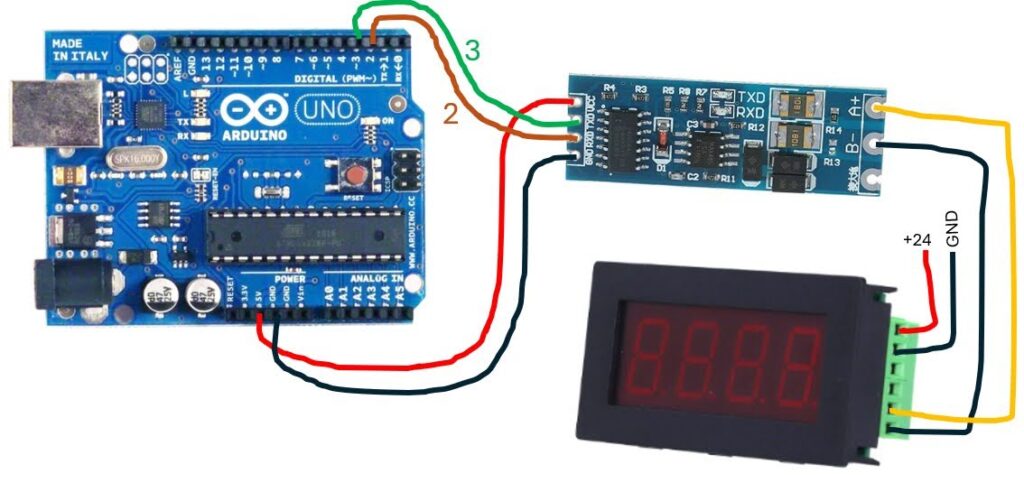
- รองรับการเชื่อมต่อกับ PLC หรือ Arduino ที่มี RS485-Modbus
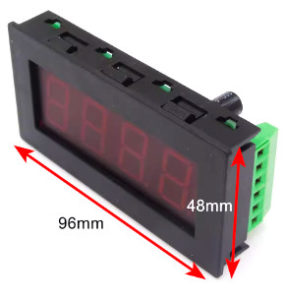
Dimension
โครงสร้าง: มาพร้อม กล่อง (housing module) ติดตั้งง่าย
- ขนาดจอแสดงผล 7 Segment Red 28x75mm
- ขนาดเจาะช่อง 45x92mm
- ขนาดรวมเคส หนา 16mm 48x96mm
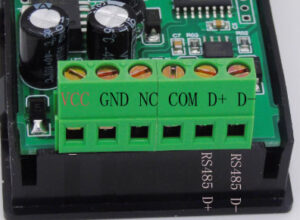
Pinout Interface
- VCC Positive Power Supply DC5-36V
- GND Negative Power Supply
- COM Negative Power Supply
- D+ RS485 Data Communication A+
- D- RS485 Data Communication B-
การตั้งค่าอุปกรณ์
- MODBUS Address: ค่าเริ่มต้นโดยทั่วไปคือ 0x01
- บอดเรต (Baud Rate): ค่าเริ่มต้น 9600bps, 8N1 (8 บิตข้อมูล, ไม่มีพาริตี้, 1 บิตหยุด)
- โปรโตคอล: MODBUS RTU (Slave Mode)
การใช้งานคำสั่ง MODBUS
| คำสั่ง | ฟังก์ชัน | อธิบาย |
|---|---|---|
0x03 |
Read Holding Register | อ่านค่าที่โมดูลเก็บไว้ |
0x06 |
Write Single Register | เขียนค่าที่ต้องการให้แสดง |
0x10 |
Write Multiple Registers | เขียนค่าหลายค่า (ไม่ค่อยใช้กับโมดูลแสดงผลนี้) |
ตัวอย่างการสั่งให้แสดงค่า “1234”
- เขียนผ่าน Function Code
0x06 - Address:
0x01 - Register Address: เช่น
0x0001 - Data:
0x1234 -
ใช้ HEX Format ส่งข้อมูลผ่าน RS485
ตัวอย่างการเชื่อมต่อกับ PLC หรือ Arduino
- เชื่อมสาย RS485 จาก PLC/Arduino → A/B ของโมดูล
- ใช้ Library MODBUS RTU หรือ RS485 Serial
- ส่งคำสั่ง MODBUS ไปยัง Address ของโมดูลเพื่อแสดงค่า
หมายเหตุ
- ค่าที่แสดงสามารถเป็นตัวเลข 4 หลักเท่านั้น (0000 – 9999 หรือ -999 ถึง 9999)
- ไม่สามารถแสดงอักขระตัวอักษรได้ (เฉพาะตัวเลข)
- หากมีสวิตช์ DIP อยู่ด้านหลัง สามารถตั้ง Address / Baudrate ได้ด้วยตัวเอง
Examples of instructions
- Display data (00 32 decimal is 50, and negative numbers are represented by the inverse code. If FF FE is sent, -001 is displayed)
- Set the position of the decimal point the range is 01 – 03
- 01 is the decimal point after the tens
- 02 is the decimal point after the hundreds
- 03 is the thousands, and only the tens and hundreds are displayed when it is negative
- Set brightness (range 01-07, the larger the data, the brighter)
- Set flash
- Set the baud rate (data range 0 – 7 corresponds to 1200, 2400, 4800, 9600, 19200, 38400, 57600, 115200)
- Set module address
Command examples
1. Display data
Hex 00 32 = Decimal 50, negative numbers are represented by inverse code. If FF FE sent, -001 will be displayed
| Address | Function | Register address | Data | CRC Check | |||
| 0x01 | 0x06 | High :0x00 | Low :0x00 | High :0x00 | Low : 0x32 | 0x08 | 0x1F |
The slave responds Display 50
| Address | Function | Register address | Data | CRC Check | |||
| 0x01 | 0x06 | High :0x00 | Low :0x00 | High :0x00 | Low : 0x32 | 0x08 | 0x1F |
2. ตั้งค่าจุดทศนิยม Set the position of the decimal point Range is 01-03
- 0x01 is the decimal point after tens แสดงจุดทศนิยมหลังหลักสิบ (เช่น 00.50)
- 0x02 is the decimal point after hundreds หลังหลักร้อย (เช่น 0.50)
- 0x03 is after thousands, only tens and hundreds are displayed for negative numbers) หลังหลักพัน (เช่น 5.0)
| Address | Function | Register address | Data | CRC Check | |||
| 0x01 | 0x06 | High :0x00 | Low :0x01 | High :0x00 | Low : 0x01 | 0x19 | 0xCA |
The slave responds
| Address | Function | Register address | Data | CRC Check | |||
| 0x01 | 0x06 | High :0x00 | Low :0x01 | High :0x00 | Low : 0x01 | 0x19 | 0xCA |
3. ตั้งค่าความสว่าง (Brightness) Set Brightness (Range 01-07, the 07 is Maximum brightness )
Set Data as 0x07 Maximum brightness ช่วง 01–07 ยิ่งตัวเลขมากยิ่งสว่าง
เช่น ตั้งค่า 03 = ความสว่างระดับ 3
| Address | Function | Relay starting address | Data | CRC Check | |||
| 0x01 | 0x06 | High :0x00 | Low :0x02 | High :0x00 | Low : 0x07 | 0x68 | 0x0B |
The slave responds
| Address | Function | Coil starting address | Data | CRC Check | |||
| 0x01 | 0x06 | High :0x00 | Low :0x02 | High :0x00 | Low : 0x07 | 0x68 | 0x0B |
4. ตั้งค่าการกะพริบ (Flashing)
- 0 ไม่กะพริบ
- ≠0 กะพริบ
Set Data as 0x00
| Address | Function | Coil starting address | Data | CRC Check | |||
| 0x01 | 0x06 | High :0x00 | Low :0x06 | High :0x00 | Low : 0x00 | 0x69 | 0xCB |
The slave responds
| Address | Function | Coil starting address | Data | CRC Check | |||
| 0x01 | 0x06 | High :0x00 | Low :0x06 | High :0x00 | Low : 0x00 | 0x69 | 0xCB |
5. Set the Baud rate
Range 0 – 7 corresponds to 1200 2400 4800 9600 19200 38400 57600 115200
Set Data as 0x03 : 9600
ตั้งค่า Baud Rate
- 0 : 1200
- 1 : 2400
- 2 : 4800
- 3 : 9600 (ค่าเริ่มต้น)
- 4 : 19200
- 5 : 38400
- 6 : 57600
- 7 : 115200
| Address | Function | Coil starting address | Data | CRC Check | |||
| 0x01 | 0x06 | High :0x00 | Low :0x07 | High :0x00 | Low : 0x03 | 0x78 | 0x0A |
The slave responds
| Address | Function | Coil starting address | Data | CRC Check | |||
| 0x01 | 0x06 | High :0x00 | Low :0x07 | High :0x00 | Low : 0x03 | 0x78 | 0x0A |
6. ตั้งค่า Address (หมายเลขโมดูล) Set module address 0-255
Display module address as follows Set the Data as 0xFF address to 255
ตัวอย่าง ตั้งค่าเป็น 2
→ ส่งคำสั่ง 0x02 ไปยังรีจิสเตอร์ที่กำหนด
→ อุปกรณ์จะตอบกลับ Address 2 เช่นกัน
| Address | Function | Coil starting address | Data | CRC Check | |||
| 0x01 | 0x06 | High :0x00 | Low :0x08 | High :0x00 | Low : 0xFF | 0x89 | 0xC9 |
The slave responds
| Address | Function | Coil starting address | Data |
CRC Check |
|||
| 0x01 | 0x06 | High :0x00 | Low :0x08 | High :0x00 | Low : 0xFF | 0x89 |
0xC9 |
💡 ตัวอย่างคำสั่งแสดงค่า 50 (00 32 ใน HEX)
| รายการ | ค่า |
|---|---|
| Address | 0x01 |
| Function | 0x06 |
| Register | 0x0000 |
| Data | 0x0032 |
| CRC | 0x01F |
ผลลัพธ์: จอแสดง “0050”
ถ้าส่งค่า FFFE จะเป็นการแสดงค่าลบ –001
ตัวอย่างการใช้งานร่วมกับ Arduino
https://drive.google.com/drive/folders/1JzKFab7e87QM87YFVBFxpPqqHZ52IgBS?usp=sharing
#include <SoftwareSerial.h>

SoftwareSerial SerialModbus(2, 3); // RX, TX

void setup() {
  // Initialize program Serial port at 115200 baud rate
  Serial.begin(9600);
  // Start the Modbus serial Port, for Soil_sensor
  SerialModbus.begin(9600);
}

void loop() {

  byte Display_request[] = { 0x01, 0x06, 0x00, 0x00,  0x00, 0x32, 0x08, 0x1F}; //50
 SerialModbus.write(Display_request, sizeof(Display_request));
  SerialModbus.flush();

delay(1000);
    Display_request[0] = 0x01;Display_request[1] = 0x06;Display_request[2] = 0x00;Display_request[3] = 0x00;Display_request[4] = 0x00;Display_request[5] = 0x01;Display_request[6] = 0x48;Display_request[7] = 0x0A; //1
 SerialModbus.write(Display_request, sizeof(Display_request));
  SerialModbus.flush();
delay(1000);
    Display_request[0] = 0x01;Display_request[1] = 0x06;Display_request[2] = 0x00;Display_request[3] = 0x00;Display_request[4] = 0x00;Display_request[5] = 0x02;Display_request[6] = 0x08;Display_request[7] = 0x0B; //2
 SerialModbus.write(Display_request, sizeof(Display_request));
  SerialModbus.flush();

  delay(1000);
    Display_request[0] = 0x01;Display_request[1] = 0x06;Display_request[2] = 0x00;Display_request[3] = 0x00;Display_request[4] = 0x00;Display_request[5] = 0x03;Display_request[6] = 0xC9;Display_request[7] = 0xCB; //3
 SerialModbus.write(Display_request, sizeof(Display_request));
  SerialModbus.flush();

    delay(1000);
    Display_request[0] = 0x01;Display_request[1] = 0x06;Display_request[2] = 0x00;Display_request[3] = 0x00;Display_request[4] = 0x00;Display_request[5] = 0x04;Display_request[6] = 0x88;Display_request[7] = 0x09; //4
 SerialModbus.write(Display_request, sizeof(Display_request));
  SerialModbus.flush();

      delay(1000);
    Display_request[0] = 0x01;Display_request[1] = 0x06;Display_request[2] = 0x00;Display_request[3] = 0x00;Display_request[4] = 0xFF;Display_request[5] = 0xFf;Display_request[6] = 0x88;Display_request[7] = 0x7A; //-1
 SerialModbus.write(Display_request, sizeof(Display_request));
  SerialModbus.flush();

        delay(1000);
   //Display_request[0] = { 0x01, 0x06, 0x00, 0x00,  0x00, 0x01, 0x48, 0x0A}; //1
    Display_request[0] = 0x01;Display_request[1] = 0x06;Display_request[2] = 0x00;Display_request[3] = 0x01;Display_request[4] = 0x00;Display_request[5] = 0x01;Display_request[6] = 0x19;Display_request[7] = 0xCA; //point
 SerialModbus.write(Display_request, sizeof(Display_request));
  SerialModbus.flush();

          delay(1000);
   //Display_request[0] = { 0x01, 0x06, 0x00, 0x00,  0x00, 0x01, 0x48, 0x0A}; //1
    Display_request[0] = 0x01;Display_request[1] = 0x06;Display_request[2] = 0x00;Display_request[3] = 0x01;Display_request[4] = 0x00;Display_request[5] = 0x00;Display_request[6] = 0xD8;Display_request[7] = 0x0A; //point
 SerialModbus.write(Display_request, sizeof(Display_request));
  SerialModbus.flush();


  //                              0       1     2     3     4     5     6     7
  byte Display_request_buf[8] = { 0x00, 0x00, 0x00, 0x00, 0x00, 0x00, 0x00, 0x00};
  SerialModbus.readBytes(Display_request_buf, 8);

   Address           = Display_request_buf[0];
   funtion           = Display_request_buf[1];
   int Register_address  = word(Display_request_buf[2], Display_request_buf[3]);
   int Data_Word         = word(Display_request_buf[4], Display_request_buf[5]);
   int CRC_Byte1         = Display_request_buf[6];
   int CRC_Byte2         = Display_request_buf[7];

  // Print sensor parameters
  Serial.print("Address: ");
  Serial.print((Address),HEX);

  Serial.print("\tfuntion: ");
  Serial.print((funtion),HEX);

  Serial.print("\tRegister_address: ");
  Serial.print(Register_address);

  Serial.print("\tData_Word: ");
  Serial.print(Data_Word);


  Serial.print("\tCRC_Byte1: ");
  Serial.print(CRC_Byte1);
  Serial.print("\tCRC_Byte2: ");
  Serial.print(CRC_Byte2);

  Serial.println();

  delay(1000);
}


รีวิว
ยังไม่มีบทวิจารณ์