คำอธิบาย
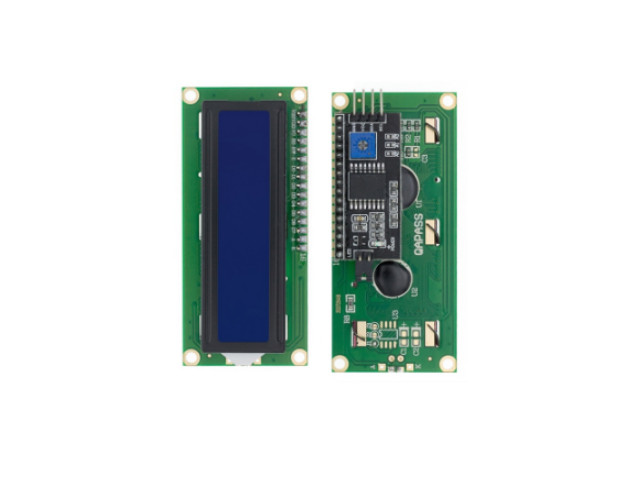
จอแอลซีดี LCD Display 16×2 สีน้ำเงิน 2 บรรทัด แบบ I2C LCD Display I2C
- PCF8574T +LCD1602A Address 0100 111 = (0x27)
- PCF8574AT +LCD1602A Address 0111 111 = (0x3F)
การเชื่อมต่อฮาร์ดแวร์
- เชื่อมต่อ VCC ของทั้ง LCD และ PCF8574 กับ 5V
- เชื่อมต่อ GND ของทั้ง LCD และ PCF8574 เข้ากับ GND
- เชื่อมต่อ SDA ของ Arduino กับ SDA ของ PCF8574+LCD1602A
- เชื่อมต่อ SCL ของ Arduino กับ SCL ของ PCF8574+LCD1602A
- เชื่อมต่อพินไฟแบ็คไลท์ LCD (หากไม่ได้ใช้แบ็คไลท์ ไม่ต้องเชื่อมต่อ) เข้ากับพินดิจิทัลบน Arduino ที่มีตัวต้านทาน (เช่น 220 โอห์ม)
- เชื่อมต่อพินข้อมูลสี่พิน (D4-D7) ของจอ LCD เข้ากับพินที่สอดคล้องกันของ PCF8574
จะต้องมีไลบรารีต่อไปนี้
LiquidCrystal_I2C: ไลบรารีนี้จัดการการสื่อสารกับ I2C LCD
LiquidCrystal_I2C: This library handles communication with the I2C LCD.Wire: This library handles I2C communication.
ตรวจสอบให้แน่ใจว่าได้ติดตั้งไลบรารี LiquidCrystal_I2C แล้ว สามารถติดตั้งได้จาก Arduino IDE Library Manager
Address เริ่มต้นจอแสดงผล LCD1602A โดยใช้ตัวขยาย PCF8574 I2C Address 0x27 จากนั้นจะมีข้อความว่า “Hello, world!” บนบรรทัดแรกของ LCD และอัปเดตบรรทัดที่สองด้วยจำนวนวินาทีปัจจุบันที่ผ่านไปนับตั้งแต่ Arduino เริ่มทำงาน
Ardyino Example Code PCF8574+LCD1602A
#include <Wire.h>
#include <LiquidCrystal_I2C.h>

// Set the LCD address to 0x27 for a 16 chars and 2 line display
LiquidCrystal_I2C lcd(0x27, 16, 2);

void setup() {
  // Initialize the LCD with the I2C address and LCD size
  lcd.init();

  // Turn on the backlight
  lcd.backlight();

  // Print a message to the LCD
  lcd.print("Hello, world!");
}

void loop() {
  // Set the cursor to the beginning of the second line
  lcd.setCursor(0, 1);

  // Print the current millis value
  lcd.print(millis() / 1000);

  delay(1000);
}
หากไม่ทราบ Address สามารถใช้ i2c_scanner สแกนหา Address ได้ดัง Code ด้านล่าง
- Arduino Playground – I2cScanner
- https://playground.arduino.cc/Main/I2cScanner
 // --------------------------------------
// i2c_scanner
//
// Version 1
//    This program (or code that looks like it)
//    can be found in many places.
//    For example on the Arduino.cc forum.
//    The original author is not know.
// Version 2, Juni 2012, Using Arduino 1.0.1
//     Adapted to be as simple as possible by Arduino.cc user Krodal
// Version 3, Feb 26  2013
//    V3 by louarnold
// Version 4, March 3, 2013, Using Arduino 1.0.3
//    by Arduino.cc user Krodal.
//    Changes by louarnold removed.
//    Scanning addresses changed from 0...127 to 1...119,
//    according to the i2c scanner by Nick Gammon
//    http://www.gammon.com.au/forum/?id=10896
// Version 5, March 28, 2013
//    As version 4, but address scans now to 127.
//    A sensor seems to use address 120.
// Version 6, November 27, 2015.
//    Added waiting for the Leonardo serial communication.
//
//
// This sketch tests the standard 7-bit addresses
// Devices with higher bit address might not be seen properly.
//

#include <Wire.h>


void setup()
{
  Wire.begin();

  Serial.begin(9600);
  while (!Serial);             // Leonardo: wait for serial monitor
  Serial.println("\nI2C Scanner");
}


void loop()
{
  byte error, address;
  int nDevices;

  Serial.println("Scanning...");

  nDevices = 0;
  for(address = 1; address < 127; address++ )
  {
    // The i2c_scanner uses the return value of
    // the Write.endTransmisstion to see if
    // a device did acknowledge to the address.
    Wire.beginTransmission(address);
    error = Wire.endTransmission();

    if (error == 0)
    {
      Serial.print("I2C device found at address 0x");
      if (address<16)
        Serial.print("0");
      Serial.print(address,HEX);
      Serial.println("  !");

      nDevices++;
    }
    else if (error==4)
    {
      Serial.print("Unknown error at address 0x");
      if (address<16)
        Serial.print("0");
      Serial.println(address,HEX);
    }
  }
  if (nDevices == 0)
    Serial.println("No I2C devices found\n");
  else
    Serial.println("done\n");

  delay(5000);           // wait 5 seconds for next scan
}


รีวิว
ยังไม่มีบทวิจารณ์