คำอธิบาย
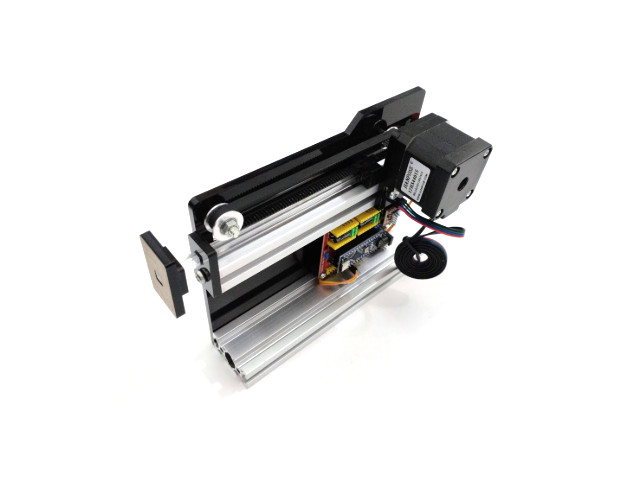
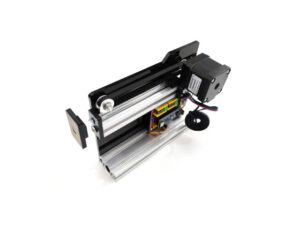
ชุดผลักชิ้นงาน สเต็ปมอเตอร์ Electric Pusher Rejector DC12V ชุดผลักชิ้นงาน push rejected แบบสเตปมอเตอร์ สำหรับผลักชิ้นงาน ดันและดึงกลับ ใช้สเตปมอเตอร์ เป็นระบบไฟฟ้า ทดแทนกระบอกสูบลม สามารถปรับความเร็ว และระยะชักได้ 8 ซม ควบคุมด้วยบอร์ด Arduino Nano มีสวิตช์กดให้ดันและดึงกลับเองอัตโนมัติ มอเตอร์พิกัดกระแส Rated Current 0.6 A Holding Torque 0.12Nm
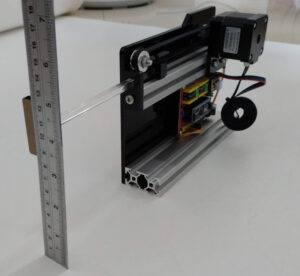
- ระยะผลัก 8cm
Dimension
- กว้าง x ยาว x สูง = WxLxH = 6cm x 20 cm x 14.5cm
- Aluminum Profile 2040T-18cm Base
- Aluminum Profile 2020T-18cm Reject
ในชุดประกอบด้วย
- 1pcs x ชุดผลักชิ้นงานไฟฟ้าสเตปมอเตอร์ Electric Pusher Rejector 12VDC
- 1pcs x PA1205 แหล่งจ่ายไฟอะแดปเตอร์ / AC-DC Adaptor 12V พร้อมใช้งาน
การทำงานชุดผลักชิ้นงานแบบใช้ไฟฟ้า
- การควบคุม Rejector-Electrical แบบแมนวล โดยสวิตช์ สวิตช์กดติดปล่อยดับ จะถูกต่อคร่อมไว้ที่ Pin D12 และ กราวน์ GND ของ CNC Shield (ตำแหน่ง Spin Enable)
- เมื่อกดสวิตช์ Pin D12 ของ Arduino NANO จะถูกต่อลงกราวน์เป็นการสั่งให้ชุดผลักชิ้นงานทำงาน (Active Low) ชุดผลักชิ้นงานจะดันออกและดึงกลับ
การสั่งให้ชุดผลักชิ้นงานทำงาน (Active Low)
- const int buttonPin0 = 12; // Switch Digital Pin Arduino NANO
- const int buttonPin1 = 9; // Switch Digital Pin Arduino NANO
การปรับความเร็ว
- stepper.set MaxSpeed(20000.0); //ปรับความเร็ว
- stepper.set Acceleration(50000.0); //ปรับความเร่ง
การปรับระยะชัก
- stepper.runToNewPosition(430); // ปรับระยะชัก
โปรแกรม Arduino บน Rejector
- Code Arduino_Rejector สำหรับโปรแกรมลงตัวบอร์ด Nano บนตัว Rejector ทางร้านได้โปรแกรมไว้ให้แล้ว
- ติดตั้ง libraries AccelStepper https://www.arduinolibraries.info/libraries/accel-stepper
#include <AccelStepper.h>
AccelStepper stepper(AccelStepper::DRIVER, 5, 2); // Define a stepper and the pins it will use

const int buttonPin2 = 9;     // Define (X+, X-) Switch active Low
//const int buttonPin2 = 10;  // Define (Y+, Y-) Switch active Low
//const int buttonPin3 = 11;  // Define (Z+, Z-) Switch active Low
const int buttonPin1 = 12;    // Define D12 Switch active Low
const int buttonPin5 = 13;  // Define D13 Switch active Low

int buttonState = 0;
char OK_flag = 0;
int count = 0;

void setup(){
    pinMode(8, OUTPUT);
    digitalWrite(8, LOW);               // enable

    stepper.setMaxSpeed(20000);         // adjust speed ปรับความเร็ว
    stepper.setAcceleration(3000);      // Adjust the acceleration ปรับอัตราเร่ง
    pinMode(buttonPin1,INPUT_PULLUP);
    pinMode(buttonPin2,INPUT_PULLUP);
    stepper.setCurrentPosition(180);
    stepper.runToNewPosition(0);
}

void loop(){
        //buttonState = digitalRead(buttonPin1);
   if ((digitalRead(buttonPin1) == LOW)||digitalRead(buttonPin2) == LOW )
          {
            delay(1);
            count++;
            if ((digitalRead(buttonPin1) == LOW)||digitalRead(buttonPin2) == LOW &&count >=20)
            {
              OK_flag = 1;
              digitalWrite(8, LOW); // enable
              count =0;
            }
          }
      if(OK_flag==1)
          {
            digitalWrite(8, LOW); // enable
            stepper.runToNewPosition(430); // ปรับระยะชัก 430
            stepper.runToNewPosition(0);
            OK_flag = 0;
          }
       else
       {
        digitalWrite(8, HIGH); // Disable
       }
}
การใช้งานร่วมกับ Arduino
การใช้ Arduino ควบคุมทำได้โดย ให้ Logic Low หรือ 0V ควบคุมขา D9 (X+) ก็ได้ หรือ D12 ก็ได้ บนแผงควบคุมของชุดผลักชิ้นงาน
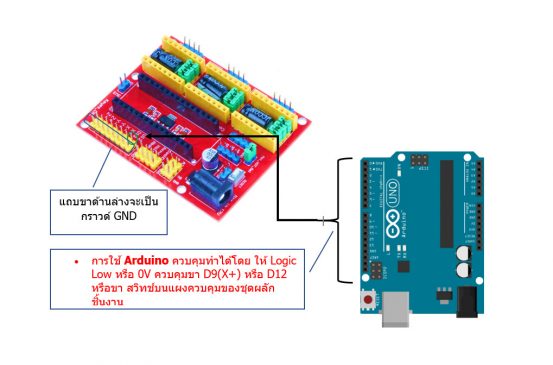

การใช้งานร่วมกับ PLC แบบ รีเรย์ Relay Output
การใช้ PLC ควบคุมทำได้โดยการตัดต่อ รีเรย์ เพื่อกด ต่อลงกราวด์ ควบคุมขา D9 (X+) ก็ได้ หรือ D12 ก็ได้ บนแผงควบคุมของชุดผลักชิ้นงาน
โดยตั้งเวลา กดสวิทช์ Timer 100mS หรือ K10 = Timer 100mS
หมายเหตุ K100 = Timer 1 Sec

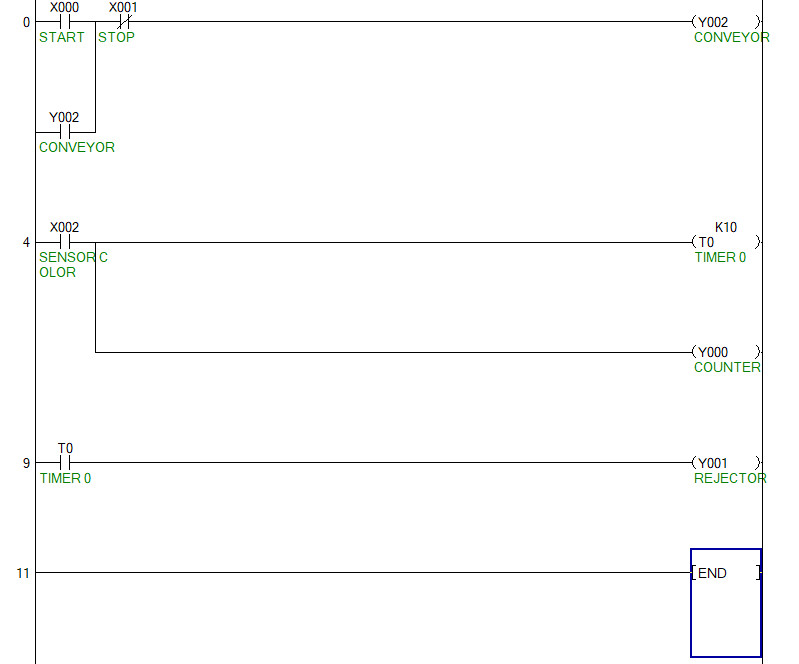
การแก้ปัญหาสัญญาณรบกวน ทำให้ตัวผลักชิ้นงาน ทำงานโดยไม่ได้สั่ง
รีวิว
ยังไม่มีบทวิจารณ์