
คำอธิบาย
Driver Robot Arm Braccio TinkerKit Arduino Uno Shield Robot
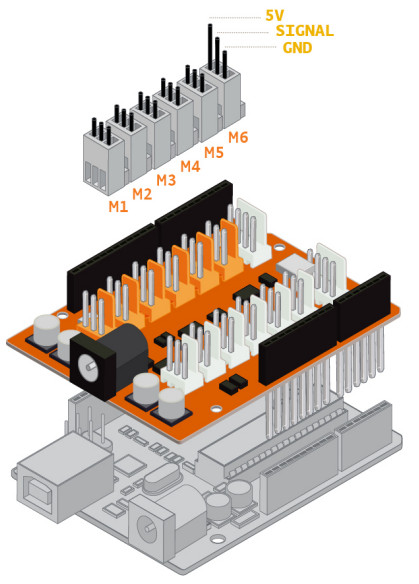
Braccio มีทั้งหมด 6 แกน:
แกน 1 – M1: base ตั้งอยู่ที่ฐานของหุ่นยนต์ ช่วยให้หุ่นยนต์หมุนจากซ้ายไปขวา 0 – 180 degrees
แกน 2 – M2: shoulder ช่วยให้แขนท่อนล่างของหุ่นยนต์เคลื่อนไหวขึ้นและลง 15 -165 degrees
แกน 3 – M3: elbow ช่วยให้แขนส่วนบนของหุ่นยนต์เคลื่อนที่ไปข้างหน้าและข้างหลังได้ 0 – 180 degrees
แกน 4 – M4: wrist แกนนี้เรียกว่าการหมุนข้อมือ และจะหมุนแขนส่วนบนของหุ่นยนต์เป็นวงกลม 0 – 180 degrees
แกน 5 – M5: wrist ช่วยให้ข้อมือของแขนหุ่นยนต์ยกขึ้นและลงได้ 0 – 180 degrees
แกน 6 – M6: gripper ช่วยให้ข้อมือของแขนหุ่นยนต์หมุนได้อย่างอิสระเป็นวงกลม 10 – 73 degrees.
6 แกนข้างต้นทั้งหมดถูกควบคุมด้วย Driver Robot Arm TinkerKit Braccio Arduino Uno Shield
คอนเนคเตอร์
| Connector Name | Shield pin |
|---|---|
| M1 | 11 |
| M2 | 10 |
| M3 | 9 |
| M4 | 6 |
| M5 | 5 |
| M6 | 3 |
| I0 | A0 (aka 14) |
| I1 | A1 (15) |
| I2 | A2 (16) |
| I3 | A3 (17) |
| I4 | A4 (18) |
| I5 | A5 (19) |
| TWI | SCL, SDA |
| Serial | RX0, TX0 |
หมายเหตุ:
Pin 12. ใช้เพื่อจัดการระดับแรงดันไฟฟ้าของซอฟต์สตาร์ท Soft-start function
Disable the Soft-start function
|
1 2 3 4 |
pinMode(12, OUTPUT); you need to set HIGH the pin 12 digitalWrite(12, HIGH); Braccio.begin(SOFT_START_DISABLED); and set a proper parameter to disable the soft start |
Compatible Arduino Boards
Model : Uno, Uno SMD, Uno WiFi, Due, Mega 2560, Ethernet, Leonardo, Leonardo ETH, M0, M0 Pro
Initialize and set up the initial position for Braccio
All the servo motors will be positioned in the “safety” position:
- Base (M1) 90 degrees
- Shoulder (M2) 45 degree
- Elbow (M3) 180 degrees
- Wrist vertical (M4) 180 degrees
- Wrist rotation (M5) 90 degrees
- Gripper (M6) 10 degrees
SCHEMATICS IN .PDF (https://store.arduino.cc)
Downloads TinkerKit Braccio Library

รีวิว
ยังไม่มีบทวิจารณ์