คำอธิบาย
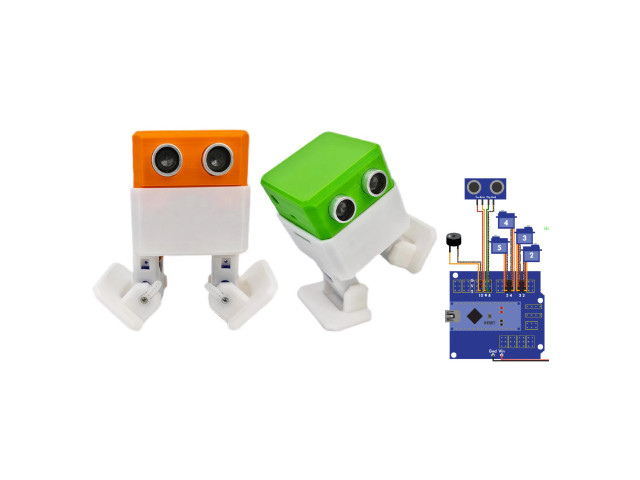
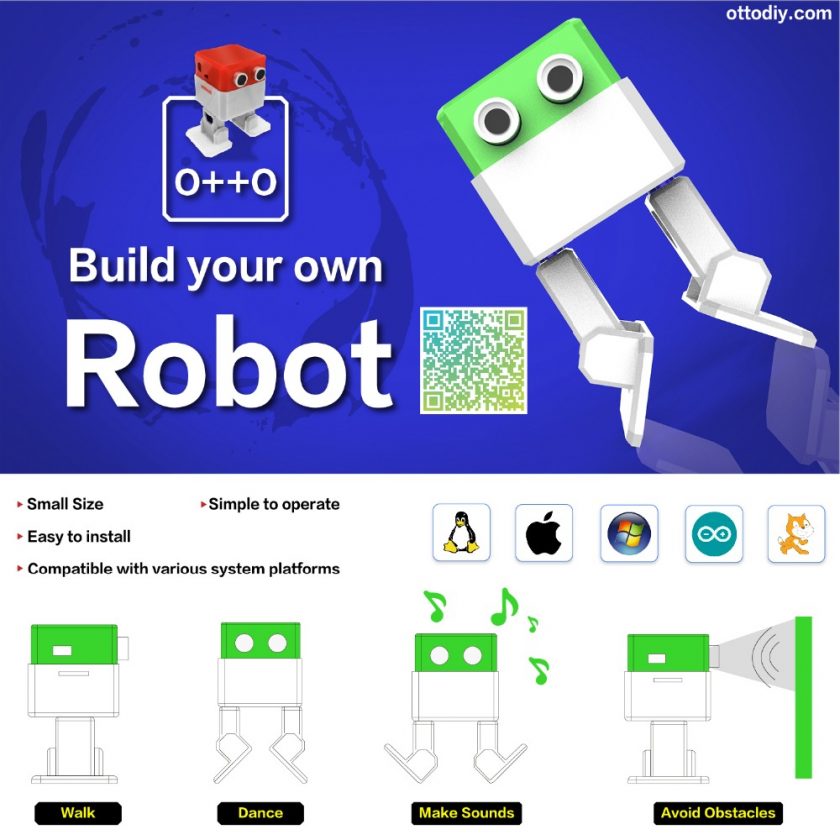
หุ่นยนต์เดิน 2 ขา OTTO Robot Arduino Nano Otto เป็นหุ่นยนต์โต้ตอบที่ใครก็สร้างได้! เป็นโอเพ่นซอร์ส เข้ากันได้กับ Arduino Otto สามารถเดิน เต้น หลบหลีกสิ่งกีดขวางได้ โครงสร้างชิ้นส่วนออกแบบโดยใช้เครื่องพิมพ์ 3 มิติ การเชื่อมต่อทางอิเล็กทรอนิกส์ และใช้ทักษะการเขียนโค้ด อย่างง่าย Otto เหมาะสำหรับผู้เริ่มต้น สามารถแก้ไขหรือสร้างขึ้นมาใหม่ได้ ไม่จำเป็นต้องมีความรู้ด้านเทคนิค
Biped Robot OTTO 3D Set 2 (3D Parts+Arduino Nano+Sensor Kit)
รายการอุปกรณ์ Otto Robot Parts
- 1Set x ชิ้นส่วน 3D Part จำนวน 6 ชิ้น
- 1pcs x นาโน Arduino Nano CH340
- 1pcs x นาโนชิลด์ Arduino NANO Shield
- 1pcs x เซ็นเซอร์อัลตราซาวนด์ HC-SR04 Ultrasound Sensor
- 1pcs x บัซเซอร์ส่งเสียง buzzer sounds
- 4pcs x ไมโครเซอร์โว Micro Servo 9G
- 1pcs x สาย USB Cable
- 4pcs x Jumper Wire Female to Female ตัวเมียต่อตัวเมีย
- 1pcs x 4xAA Battery Holder
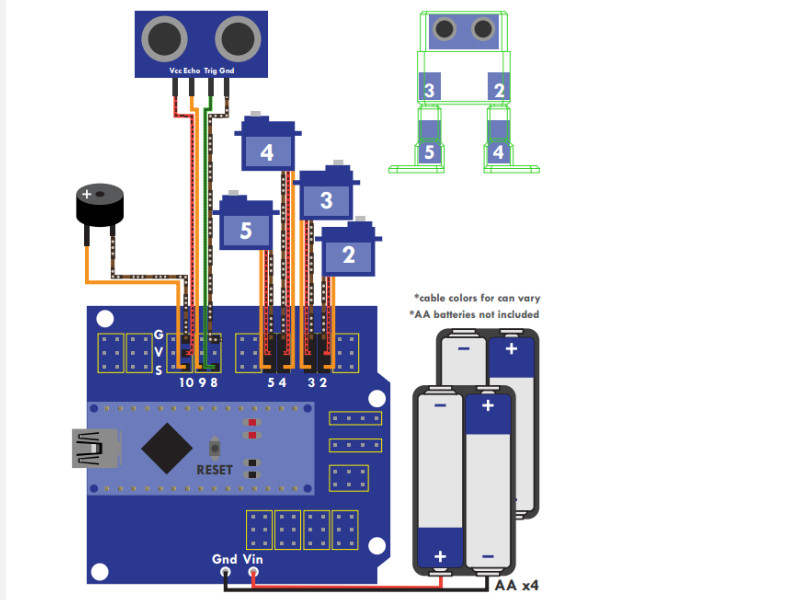
Wiring Connection
Software
- Download and install Arduino software IDE: https://www.arduino.cc/en/Main/Software
- Download Source Code https://github.com/OttoDIY/
-
Download the Otto libraries https://github.com/OttoDIY/OttoDIYLib/archive/master.zip
-
Open Arduino IDE, navigate to Sketch > Include Library > Add .ZIP Library. At the top of the drop down list, select the option to “Add .ZIP Library”.
Drivers
- CH340 Drivers http://www.wch.cn/download/CH341SER_EXE.html
More Information
- www.ottodiy.com/academy
- https://github.com/OttoDIY/OttoDIYESP?spm=a2g0o.detail.1000023.21.2cc234763AAQTR
- https://www.tinkercad.com/things/1kI624iowUR
// ตัวอย่าง OTTO หลบสิ่งกีดขวางด้วย เซ็นเซอร์อัลตราโซนิก
//---------------------------------------------------------------------------------------------------------------------------------------------------------------------
// Otto avoid obstacles with ultrasonic sensor sample sketch code
//-- Otto DIY invests time and resources providing open source code and hardware,
//-- please support by purchasing kits from https://www.ottodiy.com/
//-- Make sure to have installed all libraries: https://github.com/OttoDIY/OttoDIYLib
//--------------------------------------------------------------------------------------------------------------------------------------------------------------------
#include <Otto.h>
Otto Otto;  //This is Otto!
//----------------------------------------------------------------------

#define LeftLeg 2
#define RightLeg 3
#define LeftFoot 4
#define RightFoot 5
#define Buzzer  13
#define Trigger 8 // ultrasonic sensor trigger pin
#define Echo 9 // ultrasonic sensor echo pin

long duration, distance; //แสดงค่าระยะทาง
long ultrasound() {
   //long duration, distance;

   digitalWrite(Trigger,LOW);
   delayMicroseconds(2);

   digitalWrite(Trigger, HIGH);
   delayMicroseconds(10);

   digitalWrite(Trigger, LOW);

   duration = pulseIn(Echo, HIGH);
   distance = duration/58;

   return distance;
}

void setup() {
  Serial.begin (9600);
  Otto.init(LeftLeg, RightLeg, LeftFoot, RightFoot, true, Buzzer); //Set the servo pins and Buzzer pin
  pinMode(Trigger, OUTPUT);
  pinMode(Echo, INPUT);

}

void loop() {
    if (ultrasound() <= 15) {
      Otto.sing(S_surprise);
      Otto.playGesture(OttoConfused);
      Otto.walk(2,1000,-1); // BACKWARD x2
      Otto.turn(3,1000,1);  // LEFT x3
    }

    Otto.walk(1,1000,1); // FORWARD x1

   Serial.println(distance); //แสดงค่าระยะทาง

}
// ตัวอย่าง OTTO ร้องเพลง Happy Birthday
//----------------------------------------------------------------
//-- Otto Happy Birthday
//-- With this code Otto will walk 5 steps and then sing the happy birthday
//-- Otto DIY invests time and resources providing open source code and hardware,
//-- please support by purchasing kits from https://www.ottodiy.com/
//-- Make sure to have installed all libraries: https://github.com/OttoDIY/OttoDIYLib
//-----------------------------------------------------------------
#include <Otto.h>
Otto Otto;

#define LeftLeg 2
#define RightLeg 3
#define LeftFoot 4
#define RightFoot 5
#define Buzzer  13

int speakerPin = 13;
int length = 28; // the number of notes
char notes[] = "GGAGcB GGAGdc GGxecBA yyecdc";
int beats[] = { 2, 2, 8, 8, 8, 16, 1, 2, 2, 8, 8,8, 16, 1, 2,2,8,8,8,8,16, 1,2,2,8,8,8,16 };
int tempo = 150;

void playTone(int tone, int duration) {

for (long i = 0; i < duration * 1000L; i += tone * 2) {
   digitalWrite(speakerPin, HIGH);
   delayMicroseconds(tone);
   digitalWrite(speakerPin, LOW);
   delayMicroseconds(tone);
}
}
void playNote(char note, int duration) {

char names[] = {'C', 'D', 'E', 'F', 'G', 'A', 'B',

                 'c', 'd', 'e', 'f', 'g', 'a', 'b',

                 'x', 'y' };

int tones[] = { 1915, 1700, 1519, 1432, 1275, 1136, 1014,

                 956,  834,  765,  593,  468,  346,  224,

                 655 , 715 };

int SPEE = 5; // play the tone corresponding to the note name

/*
* Fix for => replace 17 by the size of names array
*/
for (int i = 0; i < sizeof(names); i++) {
   if (names[i] == note) {
    int newduration = duration/SPEE;
     playTone(tones[i], newduration);
   }
}
}

void setup() {
    Otto.init(LeftLeg, RightLeg, LeftFoot, RightFoot, true, Buzzer); //Set the servo pins and Buzzer pin
pinMode(speakerPin, OUTPUT);
}

void loop() {
  Otto.walk(5,1300,1);
  Otto.playGesture(OttoSuperHappy);
for (int i = 0; i < length; i++) {
   if (notes[i] == ' ') {
     delay(beats[i] * tempo); // rest
   } else {
     playNote(notes[i], beats[i] * tempo);
   }
   // pause between notes
   delay(tempo);
}
}

รีวิว
ยังไม่มีบทวิจารณ์