ตัวอย่างการควบคุม สเต็ปปิ้งมอเตอร์ขนาด 3 แอมป์ ด้วย Arduino + ไมโคร Step Driver TB6600 เบื้องต้น
Linear_Slide_LSSX05_TB6600
https://drive.google.com/drive/folders/1YALYYlV6PUrQz-IYNR843RhyF7twXqQ4?usp=sharing
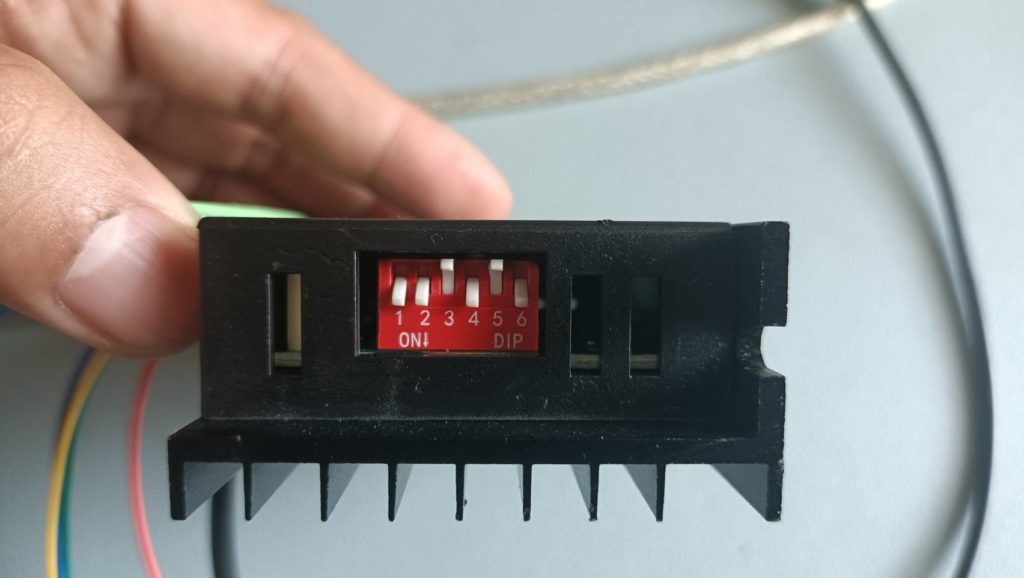
สเต็ปปิ้งมอเตอร์ขนาด 3 แอมป์ ปรับตั้ง ดิฟต์สวิตช์ของไมโคร Step Driver TB6600 ดังนี้
- DIP Switch S1 S2 S3 ตั้งเป็น ON OFF ON 400 P/R 2/A
- DIP Switch S4 S5 S6 ตั้งเป็น ON OFF OFF 2.0A
ตัวอย่างการควบคุม สเต็ปปิ้งมอเตอร์ขนาด 3 แอมป์ ด้วย Arduino + ไมโคร Step Driver TB6600 เบื้องต้น
ตัวอย่างโปรแกรมควบคุมรางสไลด์ แบบไป-กลับ ตามตำแหน่งที่กำหนด
ซอร์สโค้ดเพื่อควบคุมการทำงาน ได้ตามวีดิโอด้านบน
#include <AccelStepper.h>
 //12V full step 200 pulse/rev,       1.5A
 //    S1 S2 S3                    S4  S5  S6
 //    NO NO OFF                   NO  OFF NO

// The X Stepper pins
#define STEPPER1_DIR_PIN 3
#define STEPPER1_STEP_PIN 2

AccelStepper stepper1(AccelStepper::DRIVER, STEPPER1_STEP_PIN, STEPPER1_DIR_PIN);

 int MaxAcc = 10000;
 int MaxSpd = 800;
 int State = 0;
 int Step = 0;
void setup()
{
    stepper1.setMaxSpeed(MaxSpd);
    stepper1.setAcceleration(MaxAcc);
    stepper1.setCurrentPosition(0);
    stepper1.moveTo(1000);
    Serial.begin(9600);
    delay(2000);
    Serial.println("Power ON ");
    Serial.print("State = ");
    Serial.print(State);
    Serial.print("t position = ");
    Serial.println(stepper1.currentPosition());
    delay(2000);
}
void loop()
{
 //Serial.println(stepper1.currentPosition());
  switch (State)
  {
    case 0:    //
      if (stepper1.distanceToGo() == 0)
      {
        State =1;
        Serial.print("State = ");
        Serial.print(State);
        Serial.print("t position = ");
        Serial.println(stepper1.currentPosition());
        delay(1000);
        stepper1.moveTo(0);
      }
      break;
    case 1:    // your hand is close to the sensor
      if (stepper1.distanceToGo() == 0)
      {
        State = 2;
        Serial.print("State = ");
        Serial.print(State);
        Serial.print("t position = ");
        Serial.println(stepper1.currentPosition());
        delay(1000);
        stepper1.moveTo(2500);
      }
      break;
    case 2:    // your hand is a few inches from the sensor
      if (stepper1.distanceToGo() == 0)
      {
        State=3;
        Serial.print("State = ");
        Serial.print(State);
        Serial.print("t position = ");
        Serial.println(stepper1.currentPosition());
        delay(1000);
        stepper1.moveTo(0);
      }
      break;
    case 3:    // your hand is nowhere near the sensor
      if (stepper1.distanceToGo() == 0)
      {
        State = 4;
        Serial.print("State = ");
        Serial.print(State);
        Serial.print("t position = ");
        Serial.println(stepper1.currentPosition());
        delay(1000);
        stepper1.moveTo(-1000);
      }
      break;
    case 4:    // your hand is nowhere near the sensor
      if (stepper1.distanceToGo() == 0)
      {
        State = 5;
        Serial.print("State = ");
        Serial.print(State);
        Serial.print("t position = ");
        Serial.println(stepper1.currentPosition());
        delay(1000);
        stepper1.moveTo(0);
      }
      break;
    case 5:    // your hand is nowhere near the sensor
      if (stepper1.distanceToGo() == 0)
      {
        State = 0;
        Serial.print("State = ");
        Serial.print(State);
        Serial.print("t position = ");
        Serial.println(stepper1.currentPosition());
        delay(1000);
        stepper1.moveTo(-2000);
      }
      break;
  }

stepper1.run();
}
เอาต์พุตแสดงตำแหน่ง ที่เคลื่อนที่ไป โดยจะทำงานวนไปตั้งแต่ stateที่ 0 ถึง state 5

การต่อสายสัญญาณ ระหว่างบอร์ดอาดูโน่ และ ไดร์ฟเวอร์ สเต็ปเปอร์มอเตอร์

การตั้งค่าตัวไดร์ฟเวอร์ ขับสเต็ปเปอร์ ความละเอียด 200 สเต็ปต่อรอบ ตั้งค่ากระแส1.0 แอมป์
ตัวอย่างการสั่งงานด้วย Arduino Code
- กระแสที่ 3 แอมป์
- Micro Step = 4, PPR = 800
ตัวอย่างการสั่งงานด้วย Arduino Code สำหรับทดสอบการทำงานเบื้องต้น
- กระแสที่ 3 แอมป์
- Micro Step = 4, PPR = 800
Linear_Slide_LSSX05_TB6600
#include <AccelStepper.h>

// The X Stepper pins
#define PUL_PIN 2  // PUL_PIN
#define DIR_PIN 3  // DIR_PIN

AccelStepper stepper(AccelStepper::DRIVER, PUL_PIN, DIR_PIN);

void setup(){
    stepper.setMaxSpeed(10000.0);     // ปรับความเร็ว
    stepper.setAcceleration(10000.0); // ปรับความเร่ง
}
void loop(){
    stepper.runToNewPosition(0);
    delay(500);
    stepper.runToNewPosition(10000); // ระยะการเคลื่อนที่ไป
    delay(500);
    stepper.runToNewPosition(0);
    delay(500);
    stepper.runToNewPosition(-10000); // ระยะการเคลื่อนที่กลับ
    delay(500);
}
ตัวอย่างการสั่งงานด้วย Arduino Code แบบมี Home Limit Switch
#include <AccelStepper.h>

// The X Stepper pins
#define STEPPER1_DIR_PIN 3
#define STEPPER1_STEP_PIN 2
AccelStepper stepper(AccelStepper::DRIVER, STEPPER1_STEP_PIN, STEPPER1_DIR_PIN);
 const int buttonPin = 7; //home switch
 int state = 0;
 int buttonState = 0;
 int MaxAcc = 6000;
 int MaxSpd = 4000;
void setup()
{
     Serial.begin(9600);
     pinMode(buttonPin, INPUT_PULLUP);
    stepper.setMaxSpeed(MaxSpd); // ทดลองปรับความเร็ว
    stepper.setAcceleration(MaxAcc); // ทดลองปรับความเร่ง
}
void loop()
{
    //Serial.println(state);
    buttonState = digitalRead(buttonPin);
    if((buttonState == HIGH)&&(state == 0))//
    {
        stepper.setMaxSpeed(MaxSpd); // หมุนช้าเข้าหาสวิตช์ Home
        stepper.setAcceleration(MaxAcc);
        stepper.setSpeed(-500);
        stepper.runSpeed();

    }
    else if ((buttonState == LOW) &&(state == 0))
    {
          stepper.setMaxSpeed(MaxSpd);
          stepper.setAcceleration(MaxAcc);
          stepper.setCurrentPosition(0);
          state = 1;
          delay(1000);
    }
    if(state ==1 )
    {
      stepper.runToNewPosition(12000);
      delay(1000);
      stepper.runToNewPosition(0);
      delay(1000);
    }
}