RBAE02 หุ่นยนต์ แขนกลเพื่อการศึกษา Education Robot Arm Braccio 6 Axis DOF Arduino Full Set (ประกอบ)
Original price was: ฿16,900.00.฿14,900.00Current price is: ฿14,900.00.
มีสินค้าอยู่ 2
คำอธิบาย
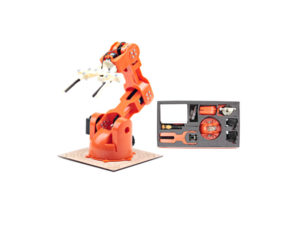
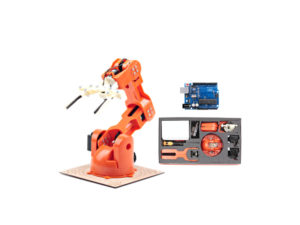
TINKERKIT BRACCIO US T050000 หุ่นยนต์แขนกล Robotic Arm พร้อมตัวควบคุม Arduino เพื่อเรียนรู้พื้นฐานหุ่นยนต์ในงานอุตสาหกรรม
- สนุกไปกับการพัฒนาเรียนรู้แขนหุ่นยนต์ Braccio เป็นแขนหุ่นยนต์ที่ควบคุมด้วย Arduino ได้อย่างสมบูรณ์แบบ
- สามารถประกอบและนำไปใช้งานได้หลายอย่าง
- ประยุกต์ใช้ในงานจับและเคลื่อนย้ายวัตถุ, จับชิ้นงานบนสายพานลำเลียง, งาน Vision กล้องติดตามวัตถุ, Image Processing, Automation, Logistics
หุ่นยนต์แขนกล Robot Arm ตัวนี้เหมาะสำหรับการเริ่มต้นศึกษาแขนกล เนื่องจากประกอบด้วยมอเตอร์ 6 ตัว BASE, SHOULDER, ELDER, VERTICAL WRIST, ROTARY WRIST, GRIPPER แขนหุ่นยนต์มีความเสถียรตลอดช่วงการเคลื่อนไหว ไม่มีการกระตุก หุ่นยนต์แขนกล Robot Arm ใช้ไฟจากอะแดปเตอร์ 5 VDC/5000mA ให้มาในกล่อง
Tinkerkit Braccio robot
Education Robot Arm Braccio 6 Axis DOF Arduino ในชุดประกอบด้วย
ชิ้นส่วนแขนกลทำจากพลาสติก ABS , สกรู, น็อตหกเหลี่ยม, สปริง, เซอร์โวมอเตอร์, Arduino Shield, ไขควง
- 21pcs x ชิ้นส่วนแขนกล
- 21pcs x สกรู
- 16pcs x แหวนรอง
- 7pcs x น็อตหกเหลี่ยม
- 2pcs x สปริง
- 2pcs x เซอร์โวมอเตอร์ SR311 Control Signal PWM Analog (3.8 kg-cm)
- 4pcs x เซอร์โวมอเตอร์ SR431 Control Signal PWM Analog (14.5 kg-cm)
- 1pcs x บอร์ดชีลด์สำหรับควบคุมแขนกล
- 1pcs x Power Supply อะแดปเตอร์ 5V/5A
- 1pcs x ไขควงแฉก
- 1pcs x Spiral Cable Protection Wrap
- 1pcs x แผ่นฐานบอกองศาขนาด 18 x 18 เซนติเมตร
- 1pcs x Board Arduino Uno R3 compatible
- รวมประกอบเป็นชุด ทดสอบให้ พร้อมใช้งาน
ในชุดประกอบด้วยเซอร์โว 6 แกน ได้แก่
- M1: SR431 Base 0° – 180°
- M2: SR431 Shoulder 15° – 165°
- M3: SR431 Elbow 0° – 180°
- M4: SR431 Wrist vertical 0° – 180°
- M5: SR311 Wrist rotation 0° – 180°
- M6: SR311 Gripper 10° – 73° // 10° is Open, 73° Closed


รายละเอียด :
- Communication USB 2
- วัสดุ Plastic ABS รับน้ำหนัก 150 กรัม ที่ระยะการทำงาน 32 ซม
- รัศมีการทำงาน 80 ซม
- ความสูงสูงสุด 52 ซม
- ความกว้างฐาน 14 ซม
- ความกว้างกริปเปอร์ 90 มม (End-effector) Free Gripper Opening size 90mm
-
Payload 150g
ตัวอย่างการประกอบชิ้นส่วนเป็นดังนี้

นอกจากจะทำเป็นแขนกลแล้ว ผู้ใช้งานยังสามารถ ดัดแปลงให้ฐานของแขนกล สามารถติดตั้งอุปกรณ์อื่นๆ เพื่มเติมได้เช่น กล้อง โทรศัพท์ หรือ แผงโซล่าร์เซล เป็นต้น

ตัวอย่างโปรแกรมแรกเริ่มเป็นดังนี้

เมื่อโหลดโค้ดข้างต้นแล้ว จะได้แขนกลเป็นลักษณะดังนี้

การเขียนโปรแกรมควบคุมแขนกลอย่างง่าย

ตัวอย่างโปรแกรม แขนกลหยิบลูกปิงปองที่อยู่บนพื้นขื้นมาโชว์แก่ผู้ควบคุม

บอร์ดชีลด์สำหรับควบคุมแขนกล เสียบลงบนบอร์ดอาดูโน่ เป็นดังรูป


ตัวอย่าง Arduino Code
- braccioOfUnoWiFi
- ciaoBraccio
- simpleMovements
- takethesponge
- testBraccio90
Braccio Arduino Library
Simple Movement
Braccio shield V4
- มี feature : “Soft-start” ฟังก์ชันนี้รวมอยู่ในฟังก์ชัน Braccio.begin() และสตาร์ท Braccio อย่างนุ่มนวลและปลอดภัยเพื่อปกป้องเซอร์โวมอเตอร์ในช่วง 8 วินาทีแรก
- “Soft-start” ทำงานทุกครั้งที่เราเรียกใช้ Braccio.begin() ในระหว่างเฟสนี้ ชิลด์ไม่ให้ระดับแรงดันไฟฟ้าสูงสุดแก่เซอร์โวมอเตอร์ และไม่ควรใช้ Braccio ยกของหนัก
- หาก Braccio เกิดการชนอะไรบางอย่างหรือถูกล็อค Resettable Fuse จะ Reset เพื่อป้องกัน ความเสียหาย
- จำเป็นต้องถอดสายไฟหรือถอดปลั๊กอะแดปเตอร์ และเสียบใหม่
Pin 12 ใช้เพื่อจัดการระดับแรงดันไฟฟ้าของ Soft-start (บน shield จะมีจุด dot แทน”12″)
หากคุณต้องการปิดใช้งานฟังก์ชัน Soft-start
มอเตอร์แต่ละตัวมีฟิวส์ป้องกัน:
- M1 ถึง M4 ถูกจำกัดไว้ที่ 1.1A
- M5 และ M6 ถูกจำกัดไว้ที่ 750mA
มอเตอร์เชื่อมต่อกับ Arduino pin
| Connector Name | Shield pin |
|---|---|
| M1 | 11 |
| M2 | 10 |
| M3 | 9 |
| M4 | 6 |
| M5 | 5 |
| M6 | 3 |
| I0 | A0 (aka 14) |
| I1 | A1 (15) |
| I2 | A2 (16) |
| I3 | A3 (17) |
| I4 | A4 (18) |
| I5 | A5 (19) |
| TWI | SCL, SDA |
| Serial | RX0, TX0 |
TWI แบบ 4 pin ช่วยให้บอร์ด Arduino สามารถสื่อสารกับอุปกรณ์ที่สนับสนุนโปรโตคอล TWI (Two Wire Interface) หรือ I2C (Inter-Integrated Circuit) ผ่าน Wire library
หมายเหตุ:
- บน Arduino UNO บัส I2C ใช้อินพุตแบบอะนาล็อก (A4 และ A5) ในขณะที่
- บน Arduino Mega บัส I2C จะอยู่ที่ pin 20 และ pin 21 การใช้ขั้วต่อ TWI บน UNO จะขัดขวาง การใช้อินพุตแบบอะนาล็อก (A4 และ A5)
- ขั้วต่อ SERIAL 4 pin ช่วยให้บอร์ดสามารถสื่อสารกับอุปกรณ์อื่นๆ ที่สนับสนุนการสื่อสารแบบ SERIAL
- หากกำลังมีการสื่อสารข้อมูลระหว่างคอมพิวเตอร์ผ่าน SERIAL อยู่ก่อน SERIAL นี้จะไม่ทำงาน
- ปุ่มกดขนาด 6 มม เพื่อรีเซ็ตการทำงานบอร์ด
- DC แจ็คสำหรับแหล่งจ่ายไฟ 5V/A
LED แสดงสถานะ
- ไฟ LED สีเขียว (LED ON) ส่งสัญญาณว่า shield เปิดอยู่
- ไฟ LED สีเขียว (LED OK) ส่งสัญญาณว่า shield ได้รับไฟเลี้ยงถูกต้อง
- ไฟ LED สีแดง (LED ERR) ส่งสัญญาณว่าได้รับไฟเลี้ยงไม่ถูกต้อง
บอร์ดที่เข้ากันได้
- Uno, Uno SMD, Uno WiFi, Due, Mega 2560, Ethernet, Leonardo, Leonardo ETH, M0, M0 Pro, Yun*, Tian*
การคำนวณ Kinematic ผกผัน
ใช้เซอร์โวมอเตอร์หกตัวที่ควบคุม ตำแหน่งของแขนและกริปเปอร์ จะใช้ในการดำเนินการจลนศาสตร์ผกผัน inverse kinematic ที่จำเป็น
ในการคำนวณเพื่อกำหนดมุมของเซอร์โวมอเตอร์แต่ละตัวเพื่อวางตำแหน่งกริปเปอร์ในพิกัด x, y, z
เซอร์โวมอเตอร์หกตัวที่ควบคุมการเคลื่อนไหวของ
- แขนหุ่นยนต์:
- ฐาน
- บ่า
- ข้อศอก
- ข้อมือ (การหมุนข้อมือ)
- มือจับ
การไปยังพิกัด x, y, z สำหรับแขนถูกกำหนดไว้ดังนี้:
- ฐานของแขนหุ่นยนต์วางอยู่บนระนาบ x, y
- แกนแนวตั้ง z ตั้งฉากกับระนาบ x, y
- ศูนย์กลางของฐานถูกกำหนดเป็น x, y, z = 0, 0, 0

ช่วงของการเคลื่อนไหว Range of Motion
การคำนวณ Kinematic ผกผัน
Inverse Kinematic Calculations
- พิกัด x, y, z สำหรับจุดยึด
- มุมของด้ามจับจากแนวนอน
- ความกว้างของ Grippers
แอปพลิเคชันตัวอย่าง
- ยกวัตถุจากตำแหน่งที่ระบุ และย้ายไปวางที่ตำแหน่งปลายทาง



รีวิว
ยังไม่มีบทวิจารณ์