
คำอธิบาย
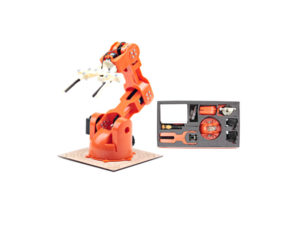
TINKERKIT BRACCIO US T050000 หุ่นยนต์แขนกล Robotic Arm พร้อมตัวควบคุม Arduino เพื่อเรียนรู้พื้นฐานหุ่นยนต์ในงานอุตสาหกรรม
- สนุกไปกับการพัฒนาเรียนรู้แขนหุ่นยนต์ Braccio เป็นแขนหุ่นยนต์ที่ควบคุมด้วย Arduino ได้อย่างสมบูรณ์แบบ
- สามารถประกอบและนำไปใช้งานได้หลายอย่าง
- ประยุกต์ใช้ในงานจับและเคลื่อนย้ายวัตถุ, จับชิ้นงานบนสายพานลำเลียง, งาน Vision กล้องติดตามวัตถุ, Image Processing, Automation, Logistics
หุ่นยนต์แขนกล Robot Arm ตัวนี้เหมาะสำหรับการเริ่มต้นศึกษาแขนกล เนื่องจากประกอบด้วยมอเตอร์ 6 ตัว BASE, SHOULDER, ELDER, VERTICAL WRIST, ROTARY WRIST, GRIPPER แขนหุ่นยนต์มีความเสถียรตลอดช่วงการเคลื่อนไหว ไม่มีการกระตุก หุ่นยนต์แขนกล Robot Arm ใช้ไฟจากอะแดปเตอร์ 5 VDC/5000mA ให้มาในกล่อง
Tinkerkit Braccio robot
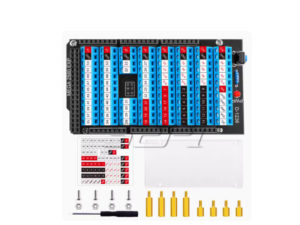
Education Robot Arm Braccio 6 Axis DOF Arduino ในชุดประกอบด้วย
ชิ้นส่วนแขนกลทำจากพลาสติก ABS , สกรู, น็อตหกเหลี่ยม, สปริง, เซอร์โวมอเตอร์, Arduino Shield, ไขควง
- ชิ้นส่วนแขนกล x 21
- สกรู x 63
- แหวนรอง x 16
- น็อตหกเหลี่ยม x 7
- สปริง x 2
- เซอร์โวมอเตอร์ 2 x SR311 Control Signal: PWM Analog (3.8 kg-cm)
- เซอร์โวมอเตอร์ 4 x SR431 Control Signal: PWM Analog (14.5 kg-cm)
- บอร์ดชีลด์สำหรับควบคุมแขนกล x 1
- Power Supply อะแดปเตอร์ 5V/5A x 1
- ไขควงแฉก x 1
- Spiral Cable Protection Wrap x 1
เซอร์โว 6 แกน
- M1: SR431 Base 0° – 180°
- M2: SR431 Shoulder 15° – 165°
- M3: SR431 Elbow 0° – 180°
- M4: SR431 Wrist vertical 0° – 180°
- M5: SR311 Wrist rotation 0° – 180°
- M6: SR311 Gripper 10° – 73° // 10° is Open, 73° is Closed

Arduino Braccio Robot Arm – Technical Specifications (Fully Assembled)
| Specification | Value |
|---|---|
| Total Weight | 792 g |
| Maximum Operating Reach (Horizontal) | 80 cm |
| Maximum Height (Vertical) | 52 cm |
| Base Width (Diameter) | 14 cm |
| Gripper Opening Width | 90 mm |
| Cable Length | 40 cm |
| Load Capacity at 32 cm Reach | 150 g |
| Load Capacity at Minimal Configuration | 400 g |

รายละเอียด
- Communication USB 2
- วัสดุ Plastic ABS รับน้ำหนัก 150 กรัม ที่ระยะการทำงาน 32 ซม
- รัศมีการทำงาน 80 ซม
- ความสูงสูงสุด 52 ซม
- ความกว้างฐาน 14 ซม
- ความกว้างกริปเปอร์ 90 มม (End-effector) Free Gripper Opening size 90mm
-
Payload 150g
ตัวอย่างการประกอบชิ้นส่วนเป็นดังนี้

นอกจากจะทำเป็นแขนกลแล้ว ผู้ใช้งานยังสามารถ ดัดแปลงให้ฐานของแขนกล สามารถติดตั้งอุปกรณ์อื่นๆ เพื่มเติมได้เช่น กล้อง โทรศัพท์ หรือ แผงโซล่าร์เซล เป็นต้น

ตัวอย่างโปรแกรมแรกเริ่มเป็นดังนี้

เมื่อโหลดโค้ดข้างต้นแล้ว จะได้แขนกลเป็นลักษณะดังนี้

การเขียนโปรแกรมควบคุมแขนกลอย่างง่าย

ตัวอย่างโปรแกรม แขนกลหยิบลูกปิงปองที่อยู่บนพื้นขื้นมาโชว์แก่ผู้ควบคุม

บอร์ดชีลด์สำหรับควบคุมแขนกล เสียบลงบนบอร์ดอาดูโน่ เป็นดังรูป


ตัวอย่าง Arduino Code
- braccioOfUnoWiFi
- ciaoBraccio
- simpleMovements
- takethesponge
- testBraccio90
Braccio Arduino Library
 /*
  testBraccio90.ino

 testBraccio90 is a setup sketch to check the alignment of all the servo motors
 This is the first sketch you need to run on Braccio
 When you start this sketch Braccio will be positioned perpendicular to the base
 If you can't see the Braccio in this exact position you need to reallign the servo motors position

 Created on 18 Nov 2015
 by Andrea Martino

 This example is in the public domain.
 */

#include <Braccio.h>
#include <Servo.h>

Servo base;
Servo shoulder;
Servo elbow;
Servo wrist_ver;
Servo wrist_rot;
Servo gripper;

Braccio braccio = Braccio(base, shoulder, elbow, wrist_ver, wrist_rot, gripper);

void setup() {
  //Initialization functions and set up the initial position for Braccio
  //All the servo motors will be positioned in the "safety" position:
pinMode(12, OUTPUT);    //you need to set HIGH the pin 12
digitalWrite(12, HIGH);

  // initialization pin Servo motors
  #if defined(ARDUINO_ARCH_SAMD)
    base.attach(11);
    shoulder.attach(7);
    elbow.attach(9);
    wrist_ver.attach(6);
    wrist_rot.attach(8);
    gripper.attach(3);
  #else
    base.attach(11);
    shoulder.attach(10);
    elbow.attach(9);
    wrist_ver.attach(6);
    wrist_rot.attach(5);
    gripper.attach(3);
  #endif

  braccio.home();
}

void loop() {
  /*
   Step Delay: a milliseconds delay between the movement of each servo.  Allowed values from 10 to 30 msec.
   M1=base degrees. Allowed values from 0 to 180 degrees
   M2=shoulder degrees. Allowed values from 15 to 165 degrees
   M3=elbow degrees. Allowed values from 0 to 180 degrees
   M4=wrist vertical degrees. Allowed values from 0 to 180 degrees
   M5=wrist rotation degrees. Allowed values from 0 to 180 degrees
   M6=gripper degrees. Allowed values from 10 to 73 degrees. 10: the toungue is open, 73: the gripper is closed.
  */

  // the arm is aligned upwards  and the gripper is closed
                     //(step delay, M1, M2, M3, M4, M5, M6);
  braccio.ServoMovement(20,         90, 90, 90, 90, 90,  73);
}
Simple Movement
/*
  simpleMovements.ino

 This  sketch simpleMovements shows how they move each servo motor of Braccio

 Created on 18 Nov 2015
 by Andrea Martino

 This example is in the public domain.
 */

#include <Braccio.h>
#include <Servo.h>

Servo base;
Servo shoulder;
Servo elbow;
Servo wrist_ver;
Servo wrist_rot;
Servo gripper;

Braccio braccio = Braccio(base, shoulder, elbow, wrist_ver, wrist_rot, gripper);

void setup() {
  //Initialization functions and set up the initial position for Braccio
  //All the servo motors will be positioned in the "safety" position:
pinMode(12, OUTPUT);    //you need to set HIGH the pin 12
digitalWrite(12, HIGH);
  // initialization pin Servo motors
  #if defined(ARDUINO_ARCH_SAMD)
    base.attach(11);
    shoulder.attach(7);
    elbow.attach(9);
    wrist_ver.attach(6);
    wrist_rot.attach(8);
    gripper.attach(3);
  #else
    base.attach(11);
    shoulder.attach(10);
    elbow.attach(9);
    wrist_ver.attach(6);
    wrist_rot.attach(5);
    gripper.attach(3);
  #endif

  braccio.home();
}

void loop() {
   /*
   Step Delay: a milliseconds delay between the movement of each servo.  Allowed values from 10 to 30 msec.
   M1=base degrees. Allowed values from 0 to 180 degrees
   M2=shoulder degrees. Allowed values from 15 to 165 degrees
   M3=elbow degrees. Allowed values from 0 to 180 degrees
   M4=wrist vertical degrees. Allowed values from 0 to 180 degrees
   M5=wrist rotation degrees. Allowed values from 0 to 180 degrees
   M6=gripper degrees. Allowed values from 10 to 73 degrees. 10: the toungue is open, 73: the gripper is closed.
  */

                       //(step delay, M1, M2, M3, M4, M5, M6);
  braccio.ServoMovement(20,           0,  15, 180, 170, 0,  73);

  //Wait 1 second
  delay(1000);

  braccio.ServoMovement(20,           180,  165, 0, 0, 180,  10);

  //Wait 1 second
  delay(1000);
}
Braccio shield V4
- มี feature : “Soft-start” ฟังก์ชันนี้รวมอยู่ในฟังก์ชัน Braccio.begin() และสตาร์ท Braccio อย่างนุ่มนวลและปลอดภัยเพื่อปกป้องเซอร์โวมอเตอร์ในช่วง 8 วินาทีแรก
- “Soft-start” ทำงานทุกครั้งที่เราเรียกใช้ Braccio.begin() ในระหว่างเฟสนี้ ชิลด์ไม่ให้ระดับแรงดันไฟฟ้าสูงสุดแก่เซอร์โวมอเตอร์ และไม่ควรใช้ Braccio ยกของหนัก
- หาก Braccio เกิดการชนอะไรบางอย่างหรือถูกล็อค Resettable Fuse จะ Reset เพื่อป้องกัน ความเสียหาย
- จำเป็นต้องถอดสายไฟหรือถอดปลั๊กอะแดปเตอร์ และเสียบใหม่
Pin 12 ใช้เพื่อจัดการระดับแรงดันไฟฟ้าของ Soft-start (บน shield จะมีจุด dot แทน”12″)
หากคุณต้องการปิดใช้งานฟังก์ชัน Soft-start:
pinMode(12, OUTPUT);    you need to set HIGH the pin 12
digitalWrite(12, HIGH);

Braccio.begin(SOFT_START_DISABLED); and set a proper parameter to disable the soft start
มอเตอร์แต่ละตัวมีฟิวส์ป้องกัน:
- M1 ถึง M4 ถูกจำกัดไว้ที่ 1.1A
- M5 และ M6 ถูกจำกัดไว้ที่ 750mA
มอเตอร์เชื่อมต่อกับ Arduino pin
| Connector Name | Shield pin |
|---|---|
| M1 | 11 |
| M2 | 10 |
| M3 | 9 |
| M4 | 6 |
| M5 | 5 |
| M6 | 3 |
| I0 | A0 (aka 14) |
| I1 | A1 (15) |
| I2 | A2 (16) |
| I3 | A3 (17) |
| I4 | A4 (18) |
| I5 | A5 (19) |
| TWI | SCL, SDA |
| Serial | RX0, TX0 |
TWI แบบ 4 pin ช่วยให้บอร์ด Arduino สามารถสื่อสารกับอุปกรณ์ที่สนับสนุนโปรโตคอล TWI (Two Wire Interface) หรือ I2C (Inter-Integrated Circuit) ผ่าน Wire library
หมายเหตุ:
- บน Arduino UNO บัส I2C ใช้อินพุตแบบอะนาล็อก (A4 และ A5) ในขณะที่
- บน Arduino Mega บัส I2C จะอยู่ที่ pin 20 และ pin 21 การใช้ขั้วต่อ TWI บน UNO จะขัดขวาง การใช้อินพุตแบบอะนาล็อก (A4 และ A5)
- ขั้วต่อ SERIAL 4 pin ช่วยให้บอร์ดสามารถสื่อสารกับอุปกรณ์อื่นๆ ที่สนับสนุนการสื่อสารแบบ SERIAL
- หากกำลังมีการสื่อสารข้อมูลระหว่างคอมพิวเตอร์ผ่าน SERIAL อยู่ก่อน SERIAL นี้จะไม่ทำงาน
- ปุ่มกดขนาด 6 มม เพื่อรีเซ็ตการทำงานบอร์ด
- DC แจ็คสำหรับแหล่งจ่ายไฟ 5V/A
LED แสดงสถานะ
- ไฟ LED สีเขียว (LED ON) ส่งสัญญาณว่า shield เปิดอยู่
- ไฟ LED สีเขียว (LED OK) ส่งสัญญาณว่า shield ได้รับไฟเลี้ยงถูกต้อง
- ไฟ LED สีแดง (LED ERR) ส่งสัญญาณว่าได้รับไฟเลี้ยงไม่ถูกต้อง
บอร์ดที่เข้ากันได้:
Uno, Uno SMD, Uno WiFi, Due, Mega 2560, Ethernet, Leonardo, Leonardo ETH, M0, M0 Pro, Yun*, Tian*
การคำนวณ Kinematic ผกผัน
ใช้เซอร์โวมอเตอร์หกตัวที่ควบคุม ตำแหน่งของแขนและกริปเปอร์ จะใช้ในการดำเนินการจลนศาสตร์ผกผัน inverse kinematic ที่จำเป็น
ในการคำนวณเพื่อกำหนดมุมของเซอร์โวมอเตอร์แต่ละตัวเพื่อวางตำแหน่งกริปเปอร์ในพิกัด x, y, z
เซอร์โวมอเตอร์หกตัวที่ควบคุมการเคลื่อนไหวของ
- แขนหุ่นยนต์:
- ฐาน
- บ่า
- ข้อศอก
- ข้อมือ (การหมุนข้อมือ)
- มือจับ
การไปยังพิกัด x, y, z สำหรับแขนถูกกำหนดไว้ดังนี้:
- ฐานของแขนหุ่นยนต์วางอยู่บนระนาบ x, y
- แกนแนวตั้ง z ตั้งฉากกับระนาบ x, y
- ศูนย์กลางของฐานถูกกำหนดเป็น x, y, z = 0, 0, 0
ช่วงของการเคลื่อนไหว Range of Motion
การคำนวณ Kinematic ผกผัน
Inverse Kinematic Calculations
- พิกัด x, y, z สำหรับจุดยึด
- มุมของด้ามจับจากแนวนอน
- ความกว้างของ Grippers
แอปพลิเคชันตัวอย่าง
- ยกวัตถุจากตำแหน่งที่ระบุ และย้ายไปวางที่ตำแหน่งปลายทาง
รีวิว
ยังไม่มีบทวิจารณ์